How to Make Adorable Elf on the Shelf Cookies
In the blink of an eye, your "scout elf" has returned from the North Pole. Yay. Now it's time to come up with 25 (or more) great ideas for daily holiday season surprises. Yikes. These adorable elf on the shelf cookies make an appearance in my house every year, and they are always a hit. Prepared with my favorite homemade sugar cookies, easy royal icing, and achievable decorating techniques, they are a great way to incorporate a love of baking into your elf on the shelf fun.
Tips for Making Exceptional Elf on the Shelf Cookies (Even if You're a Cookie Decorating Novice!)
- Use a good royal icing recipe: My royal icing cookies that I decorate are always made using meringue powder. In my years of research, I've found that meringue-based royal icing is less likely to "bleed" between colors, and it dries with the cleanest finish.
- Take it slow: When you first start decorating, take each section of the design slowly, so that you can get used to the flow of the shapes and the amount of pressure needed on your piping bag or squeeze bottle. Once you get used to decorating, your speed will naturally pick up!
- Practice, practice, practice! This recipe makes a lot of cookies, which gives you room to practice and make mistakes (turns out mistakes still taste delicious!!) Figure out which decorating height works for you. I'm tall, so I usually stack a few books under my cookies while decorating. Figure out if your icing consistency is correct. Get a feel for the piping bag and squeeze bottle.

Fun Ways to Display and Share Your Elf on the Shelf Cookies
Just a few helpful elf on the shelf ideas for the scout elves in your life!
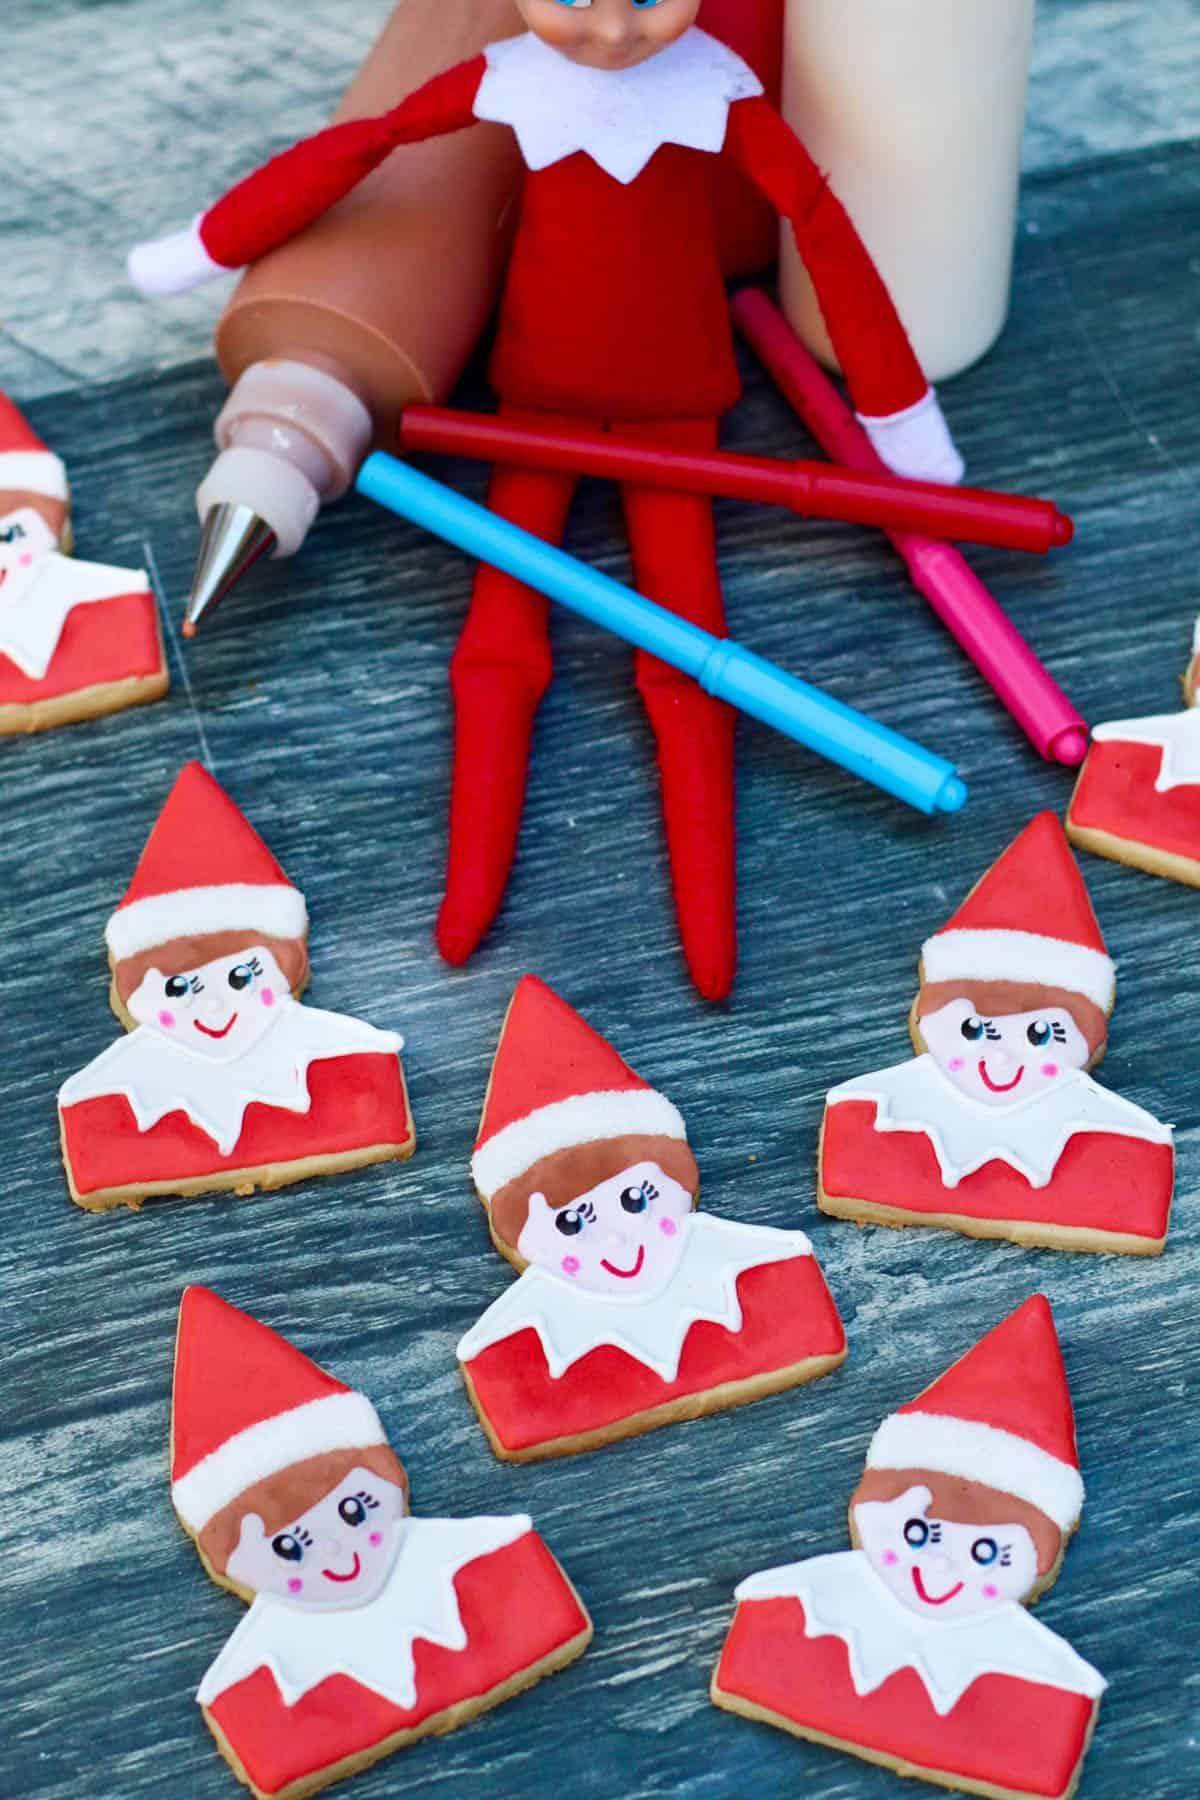
- Prop your elf up against a bottle or two of icing on a cookie sheet, surrounded by his or her lookalike cookie "elf mates!"
- Sit your elf atop a cookie jar with a sign that says "look what I made for you!" Fill the cookie jar with your elf on the shelf sugar cookies.
- Start a "12 Days of Christmas Cookies" traditional and include your elf cookies as one of the days. Leave them out on Christmas Eve as your elf heads back to the North Pole.
- Change up the recipe by making these cookies with my Best Cut Out Chocolate Sugar Cookies dough.
Watch My Elf on the Shelf Cookies Come to Life!
Recommended Ingredients and Special Tools For Making Elves
Check recipe card for specific quantities

Ingredients
- Vanilla Orange Sugar Cookie Recipe: This sugar cookie dough is my favorite recipe to use for decorated cookies, so much so that it is featured in my cookbook, 100 Best Decorated Cookies. That said, you may use any reliable sugar cookie recipe that holds its shape well while baking.
- Royal icing Recipe for Sugar Cookies: This is also a recipe that I've used consistently for the thousands of cookie's I've decorated. The post for the recipe includes "Royal Icing 101" tutorial on piping, helpful for new decorators!
- Lemon Juice: To thin royal icing.
- White sanding sugar: Fine sanding sugar works best for smaller areas. You can also use edible glitter for a similar effect.
- Gel paste food coloring: I prefer gel paste food colors over liquid food colors, as a little bit goes a long way as far as depth of color. Gel paste also does not dilute royal icing, which liquid colors tend to do.
Special Tools
To learn more about each of these tools, read my detailed post about royal icing
- Elf cookie cutter: There are dozens of options on-line for elf-shaped cutters, but you can also pipe the designs freehand on a regular circular or square-shaped cookie.
- Rolling pin
- Squeeze bottles
- Piping bag
- #2 and #3 piping tips
- Food-safe markers: These can be found in the baking section of some grocery stores, in craft stores, or online.
Step by Step Photos and instructions

Bake your Elf on the Shelf Cookies and Prep Decorating Supplies
- Cut out and bake elf-shaped cookies according to the instructions in my Vanilla Orange Sugar Cookies recipe.
- Prepare one batch of my Royal Icing Recipe for Cookie Decorating.
- Place one cup of icing into each of two separate bowls. Tint one brown and tint one light peach or ivory (see Notes in recipe card). Using lemon juice, thin the icings to "two step" consistency (detailed in post for Royal Icing) and carefully transfer each color to a squeeze bottle. Top each bottle with a coupler. Place a #2 round tip on top of each bottle.
- Place about ¾ cup of icing into a small bowl. Using lemon juice, thin the icing only slightly to piping consistency, so that it is less stiff but still not runny and will hold its shape when piped. Transfer icing to a piping bag fitted with a coupler and a #3 round tip.
- Divide the remaining icing into two bowls. Color one red and leave the other one white. Using lemon juice, thin the icings to "two step" consistency and then carefully transfer each color to a squeeze bottle. Top each bottle with a coupler. Place a #3 round tip on top of each bottle.

Decorate Elf on the Shelf Cookies
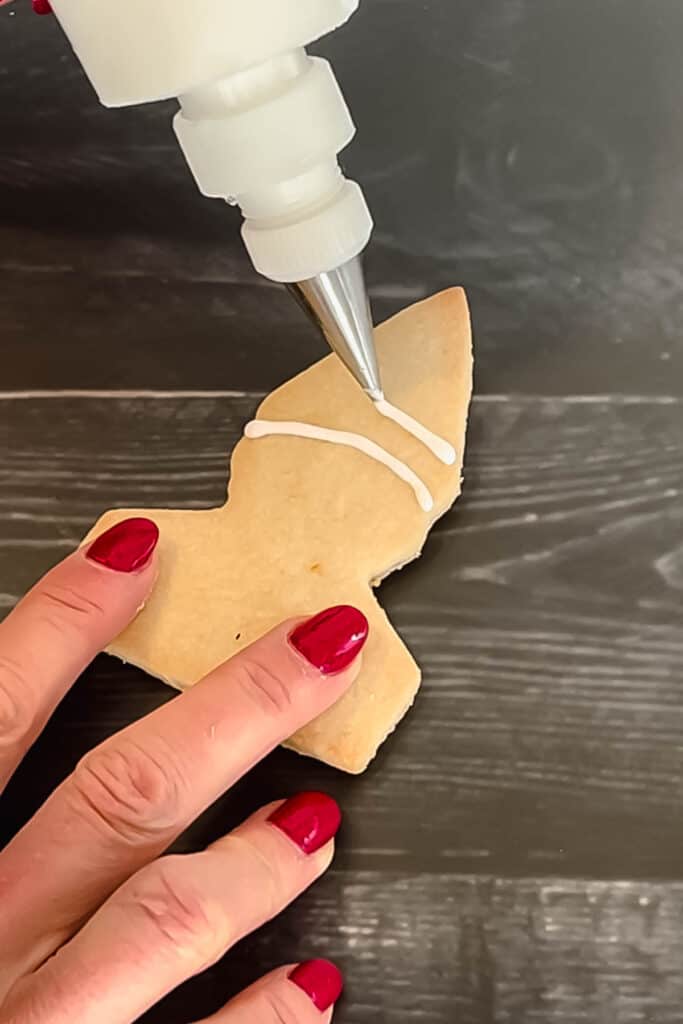
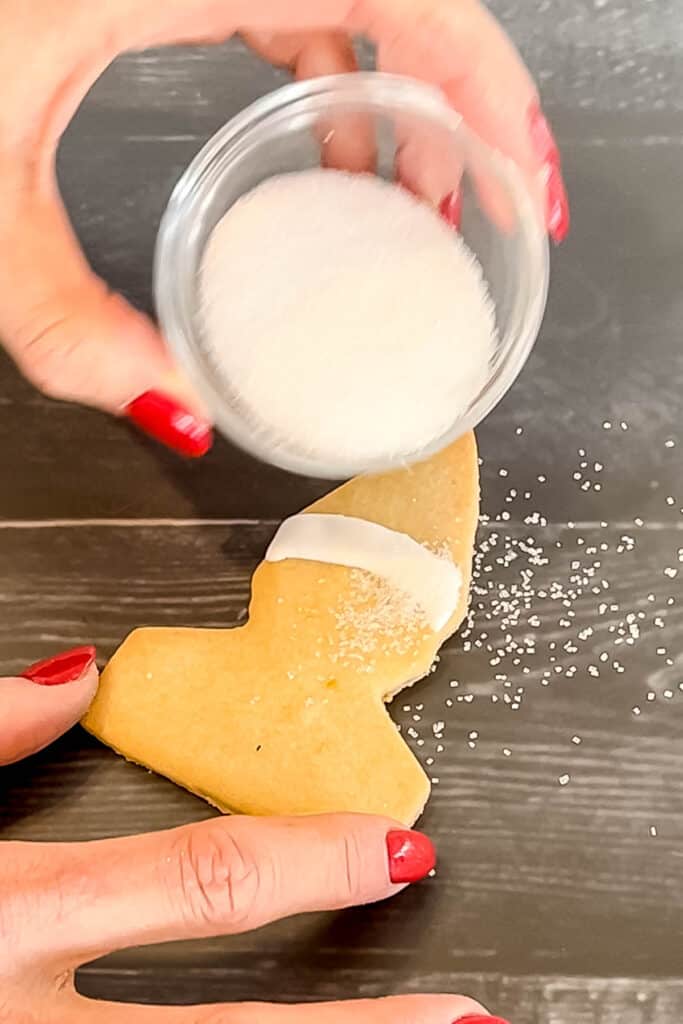
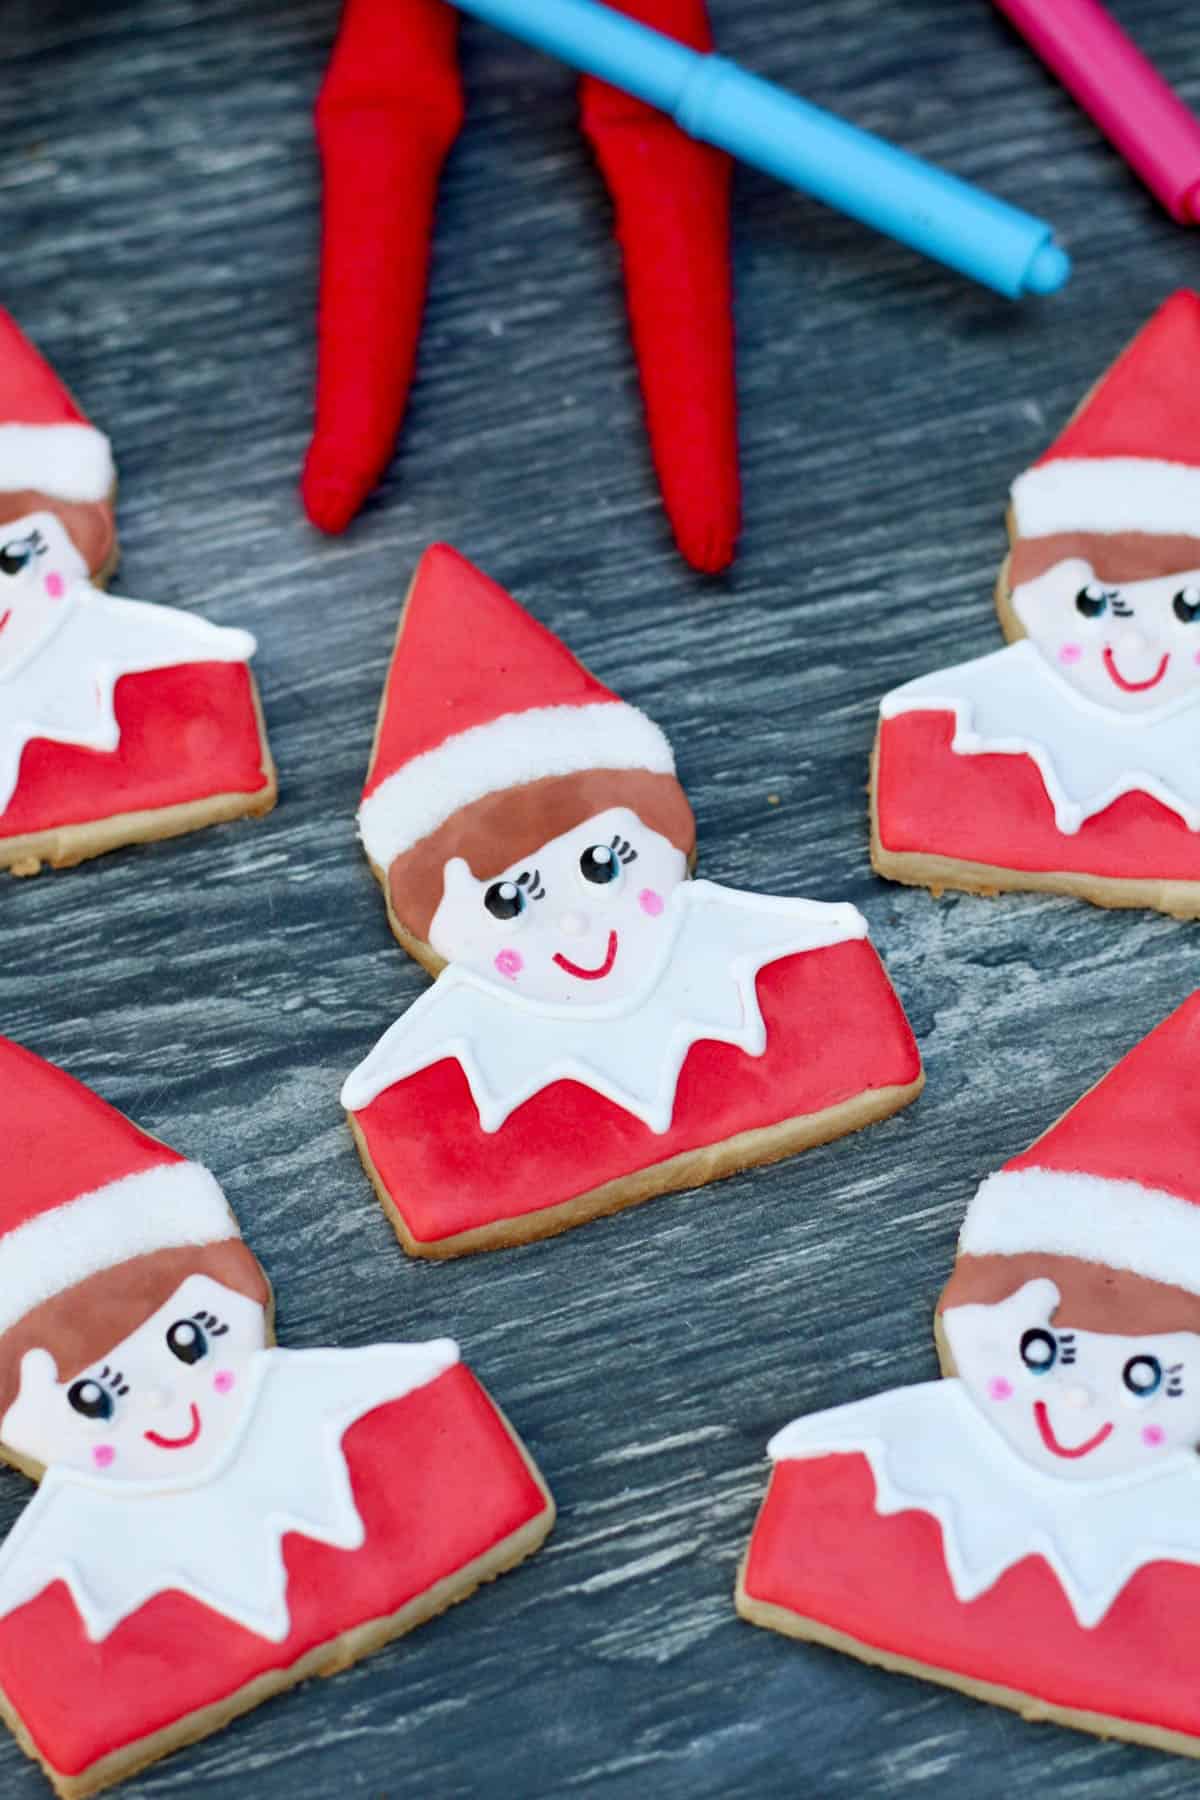
- Using the white icing in the squeeze bottle, pipe and fill the bottom of the elf hat (as shown in Step by Step photos in the post. )While icing is still wet, sprinkle with the white sanding sugar, gently shaking off extras.


2. Use the same white icing to pipe and fill the collar of the elf's shirt.
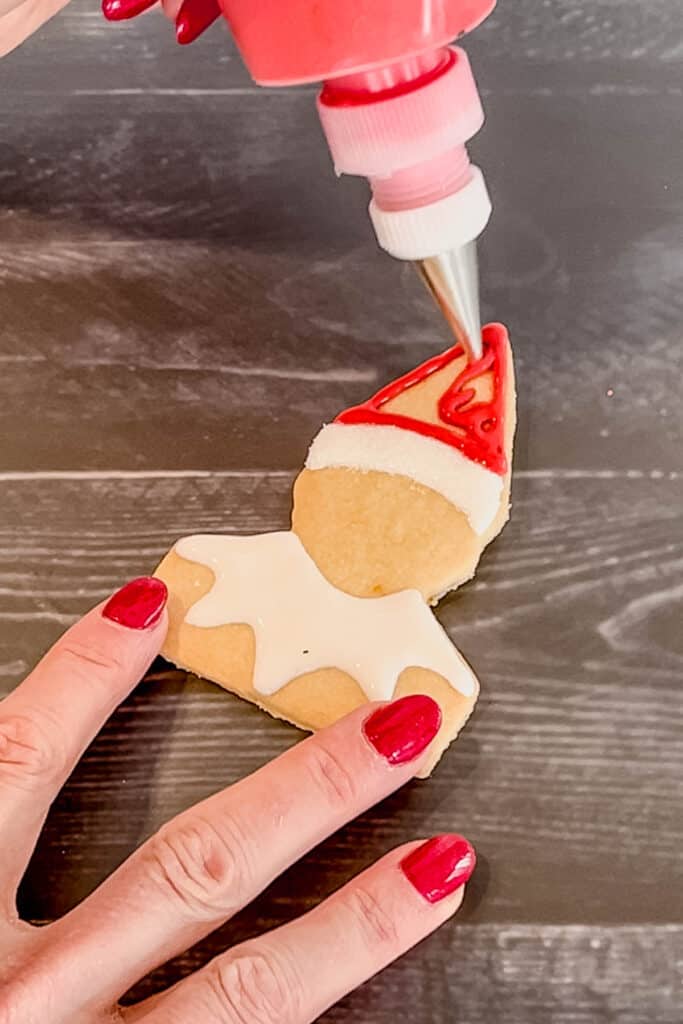

3. With red icing, pipe and fill the top of the elf's hat. Then, pipe and fill the bottom portion of the elf's shirt.
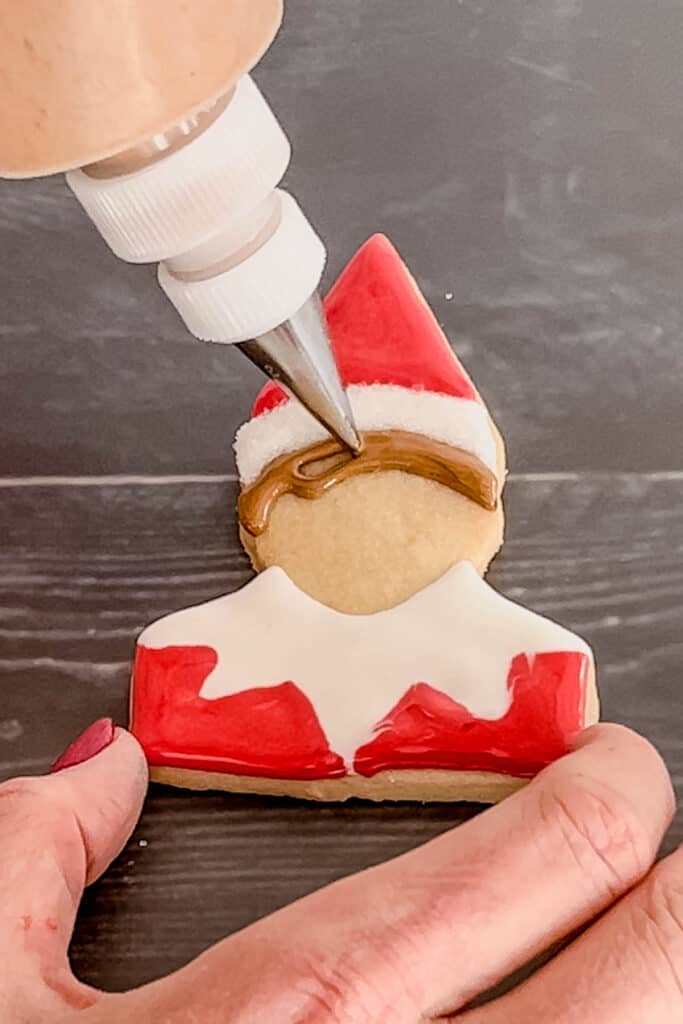
4. Use the brown icing to pipe and then fill the elf's hair under the hat.
5. Outline and fill the elf's face using the peach or ivory icing. Repeat Steps 1-4 with the other cookies, and then let the icings set for at least 30 minutes.


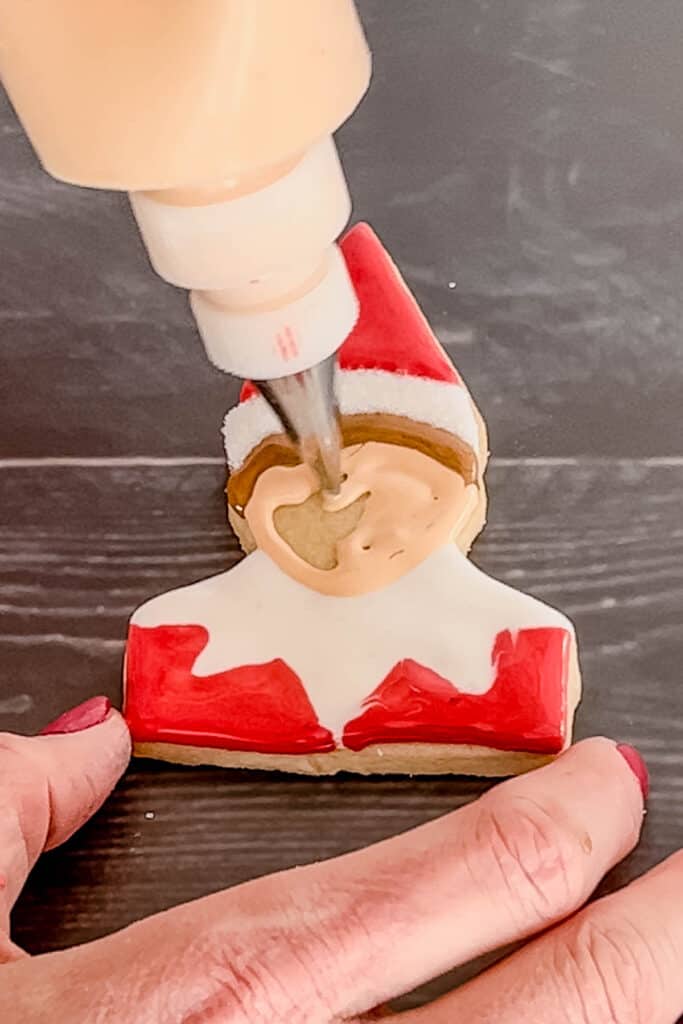
6. Once the base icings have set, use the white icing in the piping bag to outline the top part of the elf's shirt. Use the same icing to pipe two oval eyes on the elf's face.
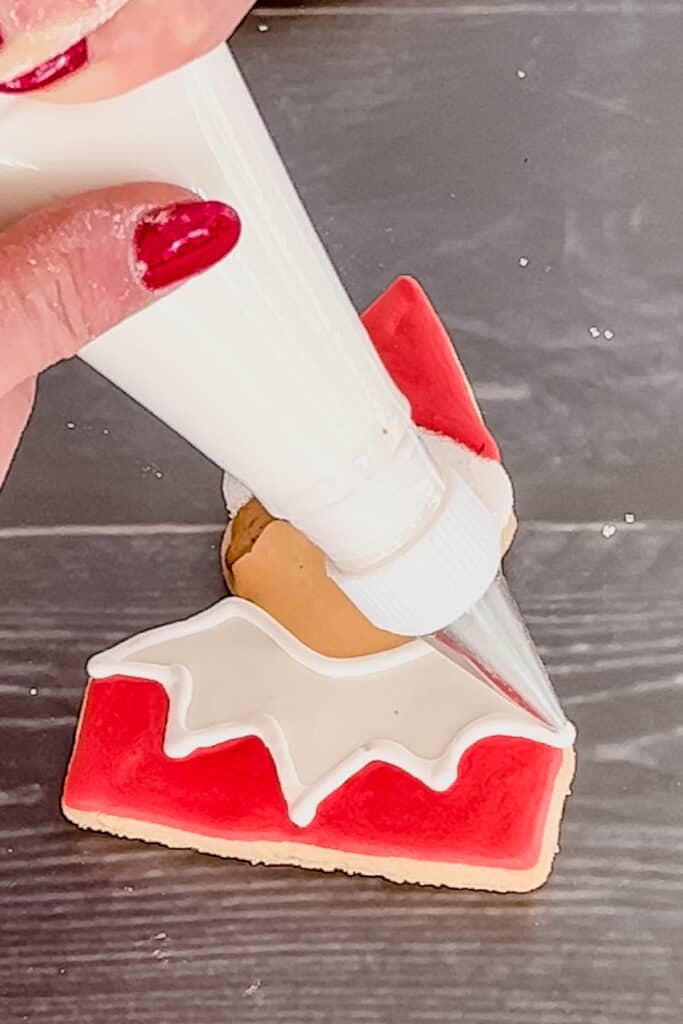
7. With the peach or ivory icing, pipe a small round nose on the elf's face. Let icings set for at least 4 hours before adding the finishing touches.


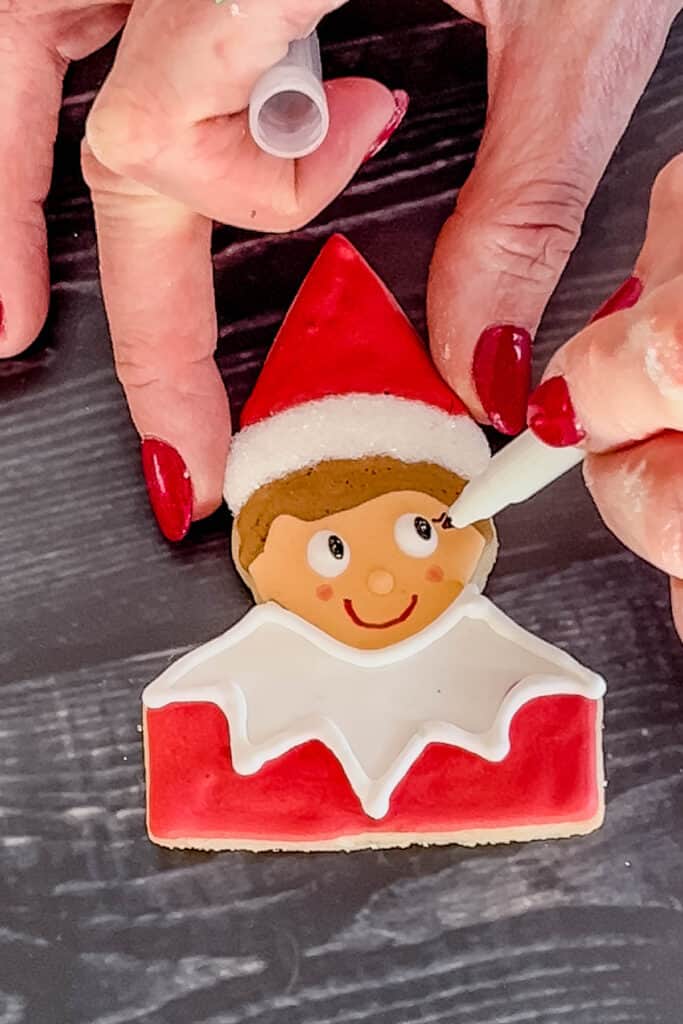
8. Once icings have dried, use your red food-safe pen to draw a smile on the elves' face. With the pink pen, add small round "rosy cheeks."
9. Use the black food-safe pen to draw smaller ovals onto the elves' eyes and sets of eyelashes onto the elves' faces.

10. With the white icing and the piping bag, pipe tiny white dots onto the center of each eye. Let icings set for at least one hour or overnight, on either wire racks on a baking sheet lined with parchment paper.
FAQ and Troubleshooting your Elf on the shelf Cookies
Shipping decorated sugar cookies can be delicate as you'll want to ensure that your delicious treat arrives looking as good as when it was packed. Here are some tips:
Individually Wrap: Wrap each cookie in plastic wrap. This protects decorations and prevents them from sticking to each other.
Layering: Place parchment paper between layers to prevent cookies from sticking.
Cushioning: Use a sturdy box and then fill empty spaces with bubble wrap, tissue paper, or crumpled parchment paper to prevent movement.
Mark as Fragile: Label the package as fragile to alert handlers to handle it with care.
Sugar cookies can be made in advance and decorated later. You can bake the cookies and then store them in an airtight container at room temperature for up to one week, or freeze them for up to 2 months. Decorating can be done within 4-5 days of when you plan to serve them, as decorations like icing and frosting may lose their vibrant appearance if applied too far in advance.
Royal icing bleeding, where colors run into each other, happens for a few reasons:
Consistency of icing: If your icing is too thin, then it's more likely to bleed into adjacent colors. Ensure your icing is at the right flood consistency—thicker icing helps maintain boundaries between colors.
Base Layer Moisture: If the base layer of icing isn't completely dry before applying the next color, the moisture from the bottom can seep into the top layer, causing bleeding.
Humidity: High humidity levels can affect royal icing. It may take longer to dry, making colors more likely to bleed. Try using a dehumidifier.
Color mixing: Darker or more vibrant colors may bleed into lighter ones. Using gel food coloring, allowing colors to dry between layers, or using icing barriers help prevent this.
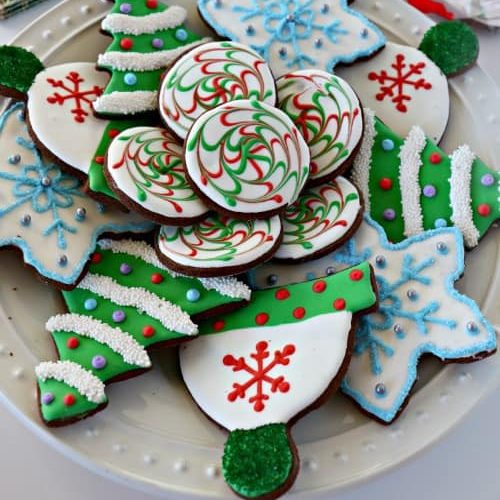
Need some More Christmas Cookie Recipes for Parties, Gifts, and holiday Fun? I've got You covered!
- Homemade White Chocolate Gingerbread Biscotti
- Triple Chocolate Cherry Cookies
- The Best Cut Out Chocolate Sugar Cookies
- Vanilla Orange Sugar Cookies
Tried this recipe and loved it? Take a photo and tag me on Instagram or give it a review!

Elf on the Shelf Cookies
Equipment
- 1 Elf cookie cutter (see "Ingredients and Special Tools" section in post)
- Rolling Pin
- 4 8 oz squeeze bottles (see "Ingredients and Special Tools" section in post)
- 1 piping bag
- #2 and #3 round piping tips
- Red, pink, and black food-safe markers
Ingredients
- 1 recipe Vanilla Orange Sugar Cookie dough
- 1 recipe Royal Icing for Decorating Cookies
- Red, ivory, peach, and brown gel paste food colors (see "Ingredients and Special Tools" section in post)
- Lemon juice
- White sanding sugar
Instructions
Prep Cookies and Decorating Supplies
- Cut out and bake elf-shaped cookies according to the instructions in my Vanilla Orange Sugar Cookies recipe.
- Prepare one batch of my Royal Icing Recipe for Cookie Decorating.
- Place one cup of icing into each of two small bowls. Tint one brown and tint one light peach or ivory (see Notes). Using lemon juice, thin the icings to "two step" consistency (see post for Royal Icing for Cookie Decorating) and carefully transfer each color to a squeeze bottle. Top each bottle with a coupler. Place a #2 round tip on top of each bottle.
- Place about ¾ cup of icing into a small bowl. Using lemon juice, thin the icing only slightly to piping consistency, so that it is less stiff but still not runny and will hold its shape when piped. Transfer icing to a piping bag fitted with a coupler and a #3 round tip.
- Divide the remaining icing into two bowls. Color one red and leave the other one white. Using lemon juice, thin the icings to "two step" consistency (see post for Royal Icing for Cookie Decorating) and carefully transfer each color to a squeeze bottle. Top each bottle with a coupler. Place a #3 round tip on top of each bottle.
Decorate Elf Cookies
- Using the white icing in the squeeze bottle, pipe and fill the bottom of the elf hat (as shown in Step by Step photos in the post. )While icing is still wet, sprinkle with the white sanding sugar, gently shaking off extras.
- Use the same white icing to pipe and fill the collar of the elf's shirt.
- With red icing, pipe and fill the top of the elf's hat. Then, pipe and fill the bottom portion of the elf's shirt.
- Use the brown icing to pipe and fill the elf's hair under the hat.
- Outline and fill the elf's face using the peach or ivory icing. Repeat Steps 1-4 with the other cookies, and then let the icings set for at least 30 minutes.
- Once the base icings have set, use the white icing in the piping bag to outline the top part of the elf's shirt. Use the same icing to pipe two oval eyes on the elf's face.
- With the peach or ivory icing, pipe a small round nose on the elf's face. Let icings set for at least 4 hours before adding the finishing touches.
- Once icings have dried, use your red food-safe pen to draw a smile on the elves' face. With the pink pen, add small round "rosy cheeks."
- Use the black food-safe pen to draw smaller ovals onto the elves' eyes and sets of eyelashes onto the elves' faces.
- With the white icing and the piping bag, pipe tiny white dots onto the center of each eye. Let icings set for at least one hour or overnight.
Video
Notes
- When coloring the royal icing for the elves' faces. I usually do a mix of ivory and peach. But you can use one or the other as well as light pink, brown, dark brown.....even green if you want to make "Grinch elves!"
- Once decorated, these cookies can be stored at room temperature in an airtight container for up to one week, depending on the humidity in your kitchen.