Decorated Butterfly Cookies With Easy Royal Icing
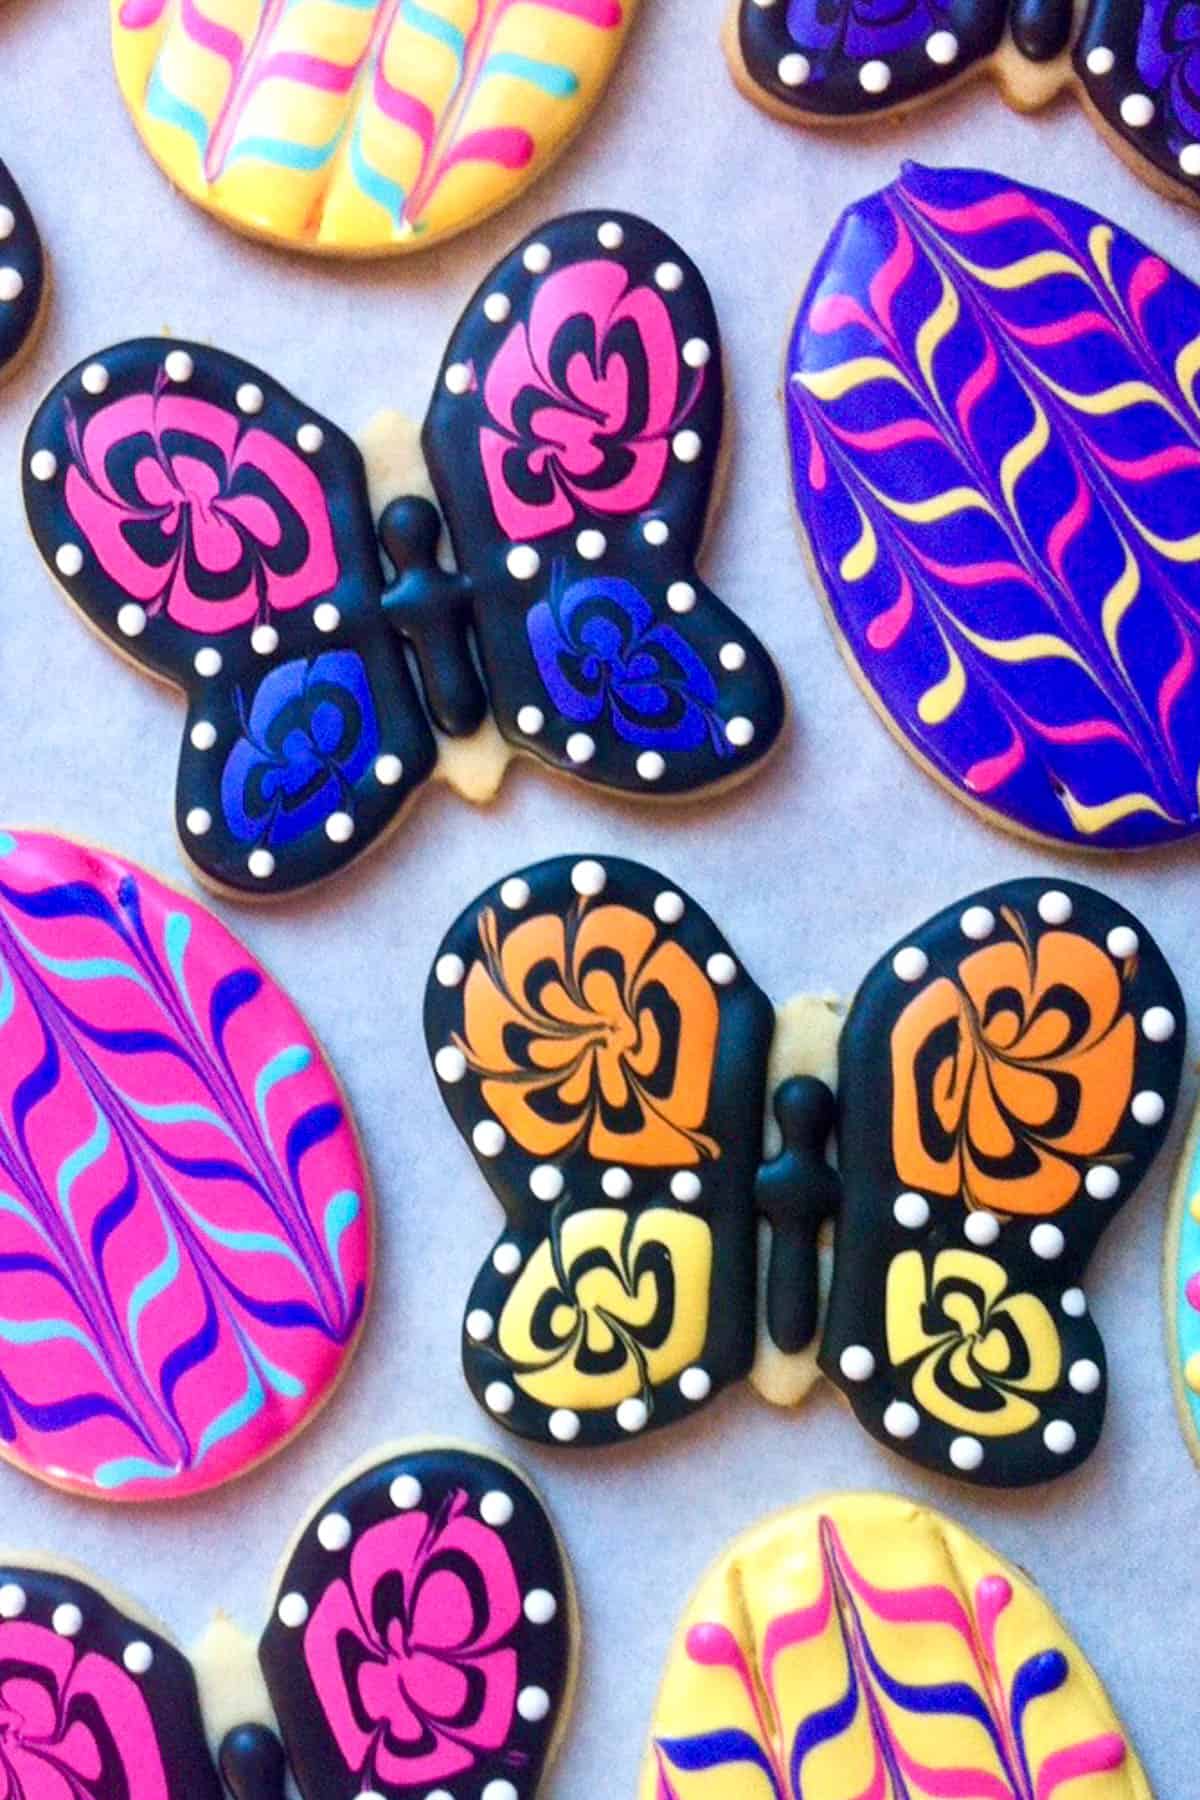
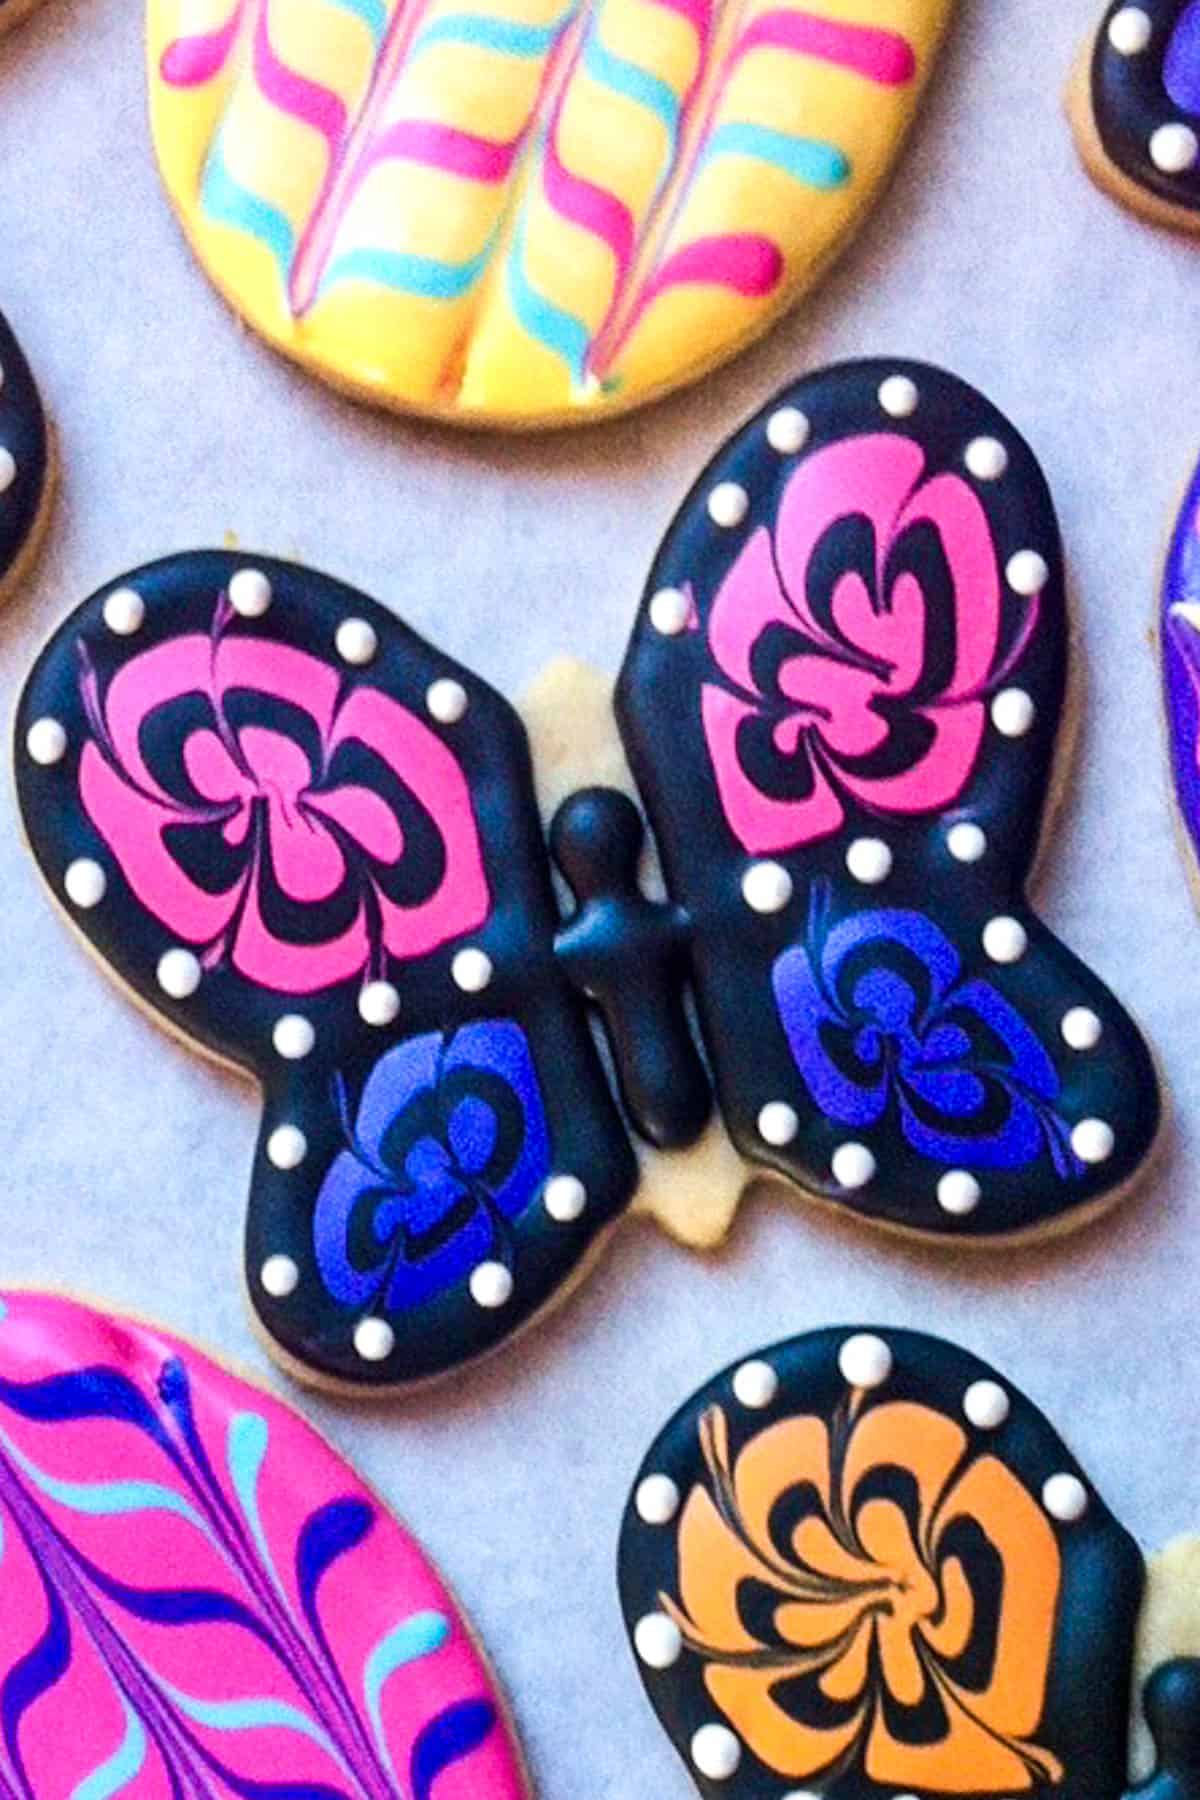
Beautiful Butterfly Cookies are bright, cheerful, and perfect for birthday parties, baby showers, dessert table party favors, or any number of special occasions where you want to show off your stellar cookie-decorating skills. And by the end of this post, you (yes, you!) will be equipped to make your own colorful and delicious butterfly sugar cookies, too.
How am I so Sure that you can Make these Cookies?
I have decorated thousands of cookies in my lifetime, from a dozen Elf on the Shelf cookies at Christmas time to a custom order of 450 cookies for an Alice in Wonderland themed event (there were Mad Hatter cookies on every single surface in my house!)
AND, I wrote the book {literally!!} on cookie decorating, teaching amateur and experienced cookie decorators alike to decorate 100 different shapes. It was essentially my only focus for 6 months, and my kitchen was a sea of sugar cookies, royal icing, and embellishments.
Just follow my doable step-by-step instructions, photos, and tips, and your fluttery butterfly cookies will come together beautifully.
Watch These Colorful Butterfly Cookies Take Shape
Top Tips for Decorating Beautiful Butterfly Cookies
- Mix your royal icing carefully: Make sure the icing is fully mixed before adding your gel and then thinning it with lemon juice or water. This will ensure proper drying and colors that don't bleed.
- Use gel paste colors: I prefer gel paste food colors over the more common "liquid" colors, as gel colors are more concentrated, and they don't dilute your icing as much as liquids.
- Take your time.....and practice!: I'm not sure if "speed decorating" is a thing, but I don't recommend it here if it is. Allow yourself some time to decorate, so that you are not rushing through the steps. After the first few cookies, I always find myself getting into a "cookie decorating groove, " and the steps and icings flow much easier. And, whatever you do, do not get frustrated. They are cookies....butterfly cookies....and they should be fun.
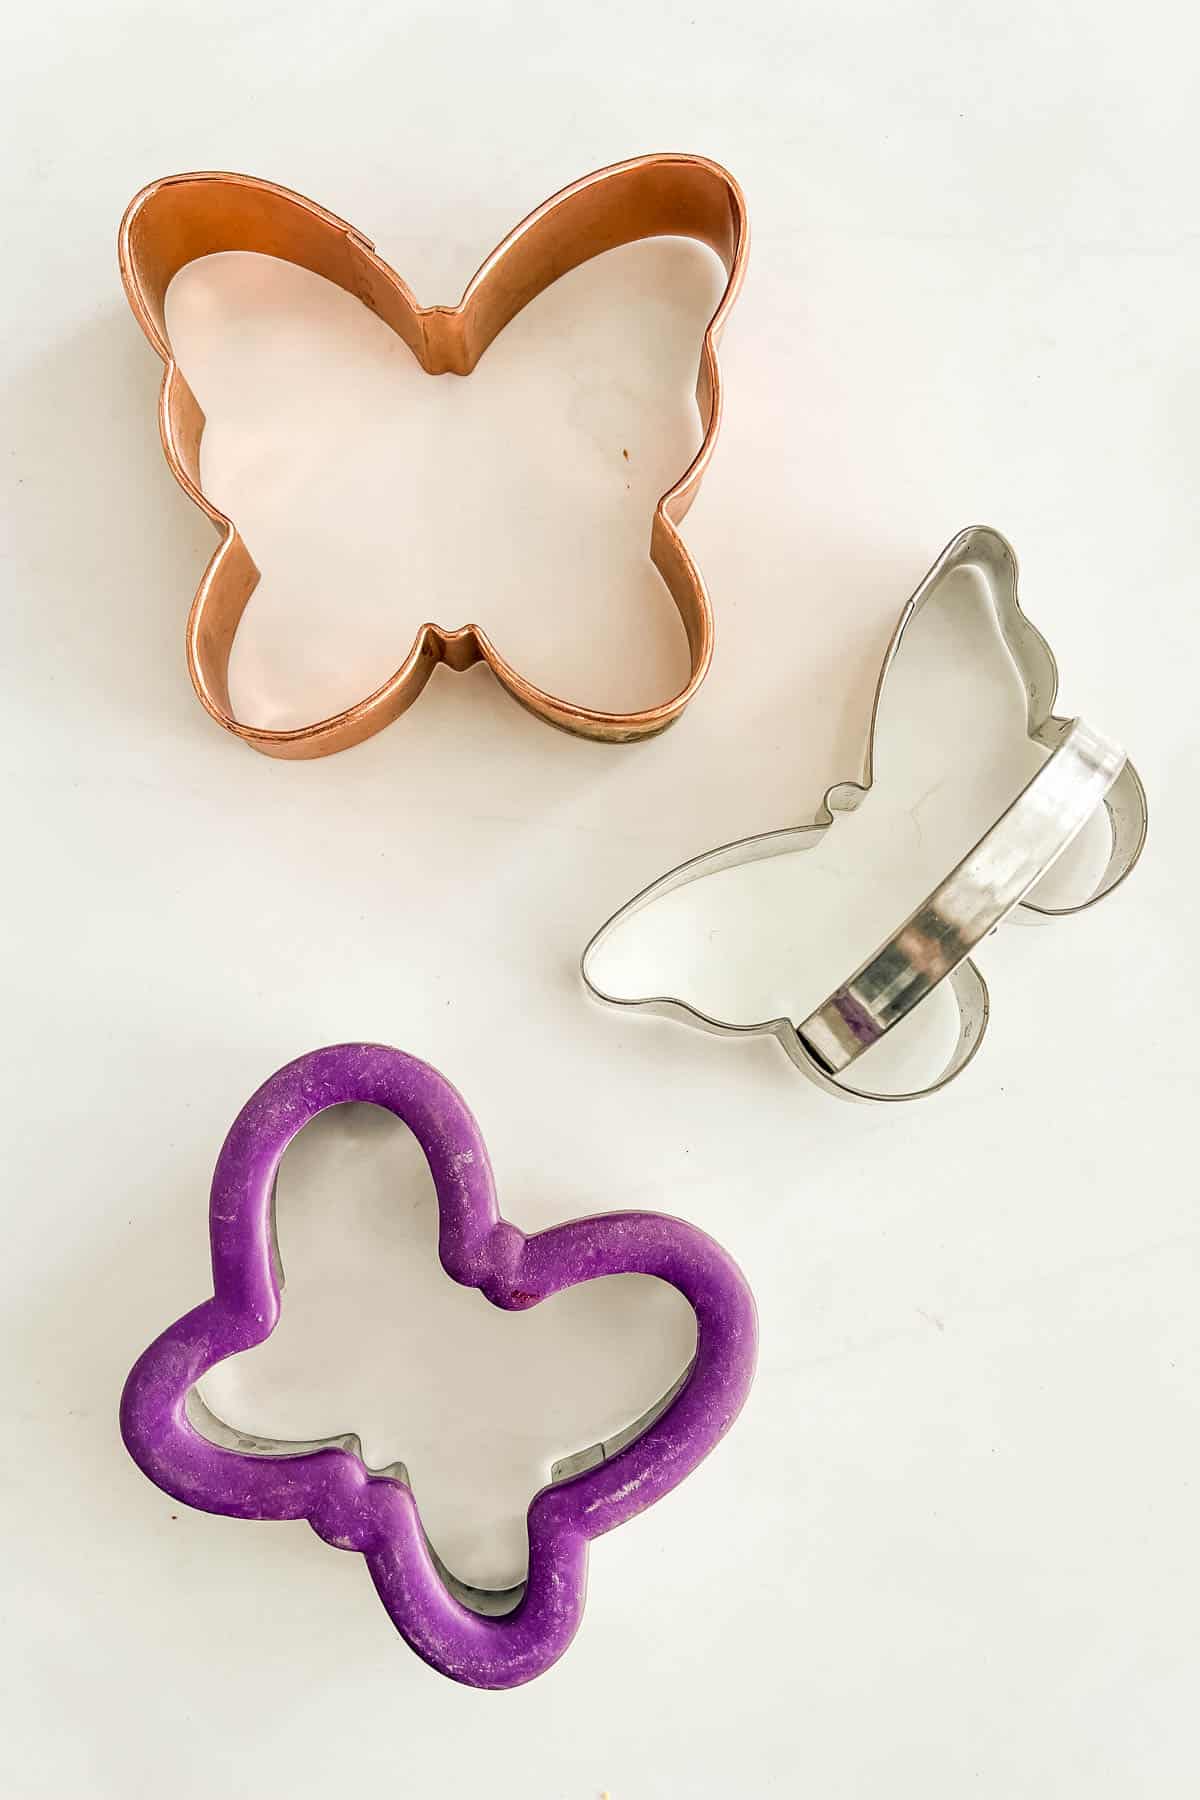
Choosing your Cookie Cutter
As you can see from the photo, above, I have a range of butterfly cookies cutters from which I can choose (my cutter collection is huge....I might have a small problem!) But these cookies will work for almost any size, from large 5 or 6-inch cutters down to 2-inch typical mini cutters. Think about the following factors when choosing your cookie cutter:
Purpose / Presentation
- Small (2 inch): Bite-sized cookies, nice for tea parties or cookie trays.
- Medium (2–3 inches): The standard size for most cookies—easy to decorate and serve.
- Large (4+ inches): Statement cookies, themed designs, or personalized messages.
Packaging
- Smaller cookies fit neatly into jars or boxes, while larger ones need more space.
- If pairing with other treats (i.e cookie platter), mix sizes for variety.
Design
- Detailed deigns work best in medium-to-large sizes.
- Simple shapes can be made in smaller sizes. You can absolutely make hand-decorated mini butterfly cookies, but the detail work will be much more precise!
Ingredients and Special Tools
Please check the recipe card at the bottom of the post for specific quantities!
Butterfly Cookie Ingredients
- One recipe Vanilla Orange Sugar Cookies dough: This will make 24-36 cookies, depending on your cutter size. You can also divide dough in half and freeze the rest for another use.
- One recipe Royal Icing for Decorating Cookies
- Lemon juice: For thinning royal icing. Feel free to substitute a different flavoring and water instead. See my royal Icing recipe for suggested flavor variations.
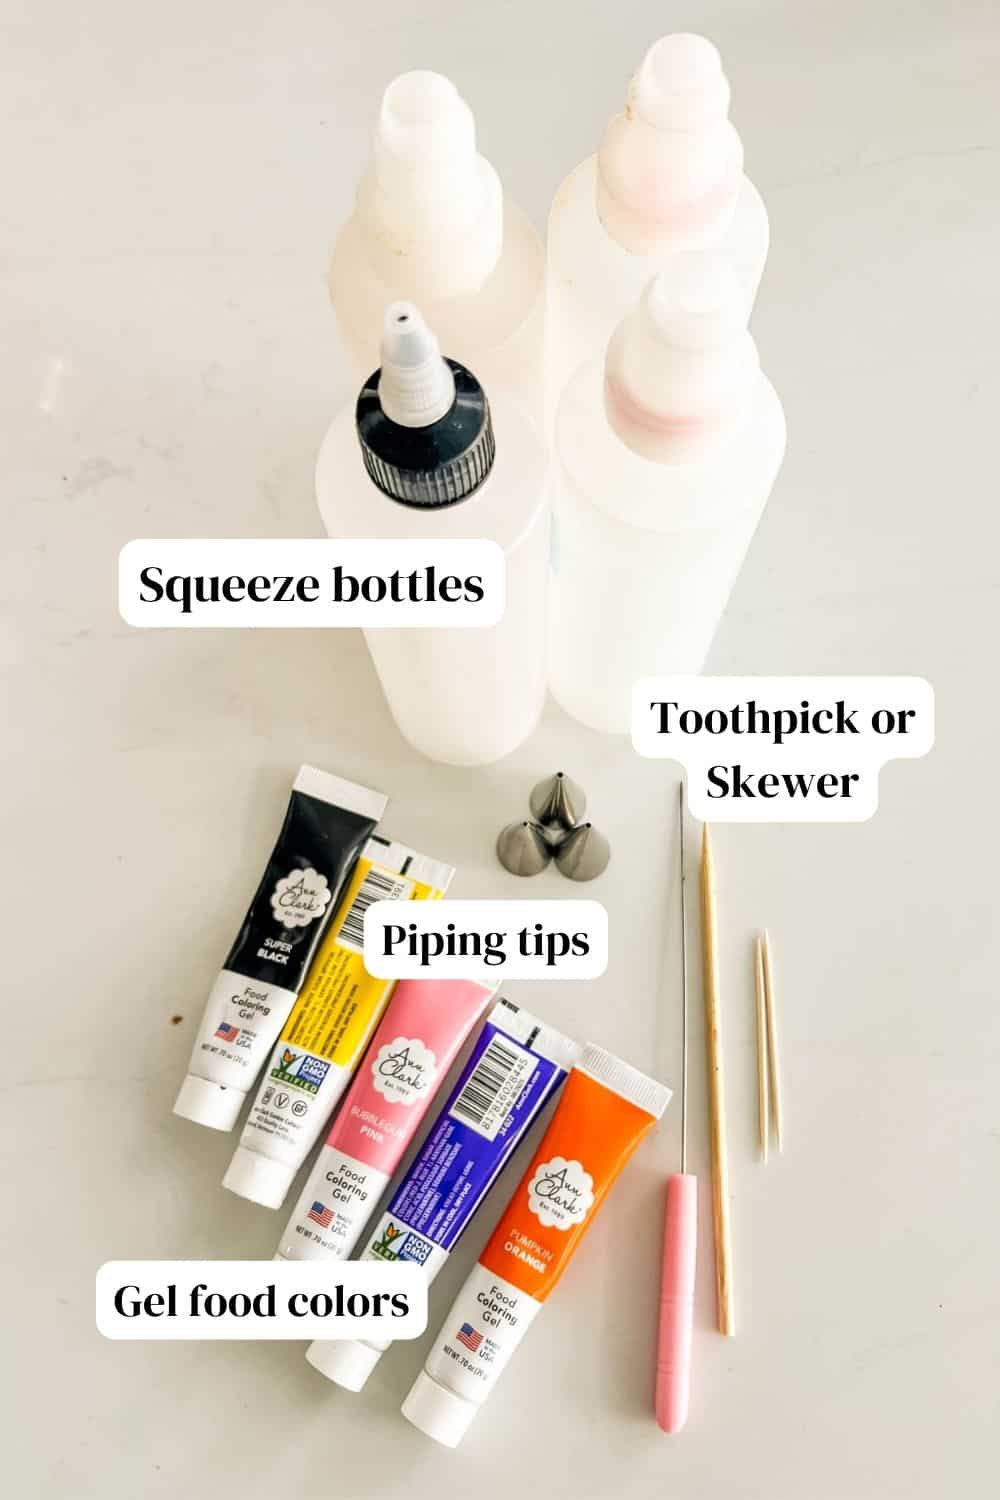
- Black, pink and purple, orange and yellow (or another combination) gel food color. See my "Top Tips" above for why I think gel based food coloring is the best choice.
Butterfly Cookie Special Tools
To learn more about each of these tools, read my detailed post about royal icing.
- Butterfly cookie cutter (see "Choosing Your Cookie Cutter" above)
- Squeeze bottles (4)
- Couplers
- Piping tips: #1 or #2 and #3 round tips: If you are using squeeze bottles with built-in tips, then these tips and the couplers are not needed.
- Toothpicks, wooden skewers, or a "sugar stir needle" : For creating the butterfly wing design.
- Offset or flat spatula: Can be useful for filling in larger areas with colors. I tend to use the tip of my piping tip though!
- Separate bowl: For mixing colors.
Step By Step Photos and Instructions
Part 1: Bake the Butterfly Cookies and Prepare the Royal Icing
- Cut out and bake butterfly-shaped sugar cookies according to my Vanilla Orange Sugar Cookie Recipe (trust me, it's good!) Or use another good sugar cookie recipe.
- Prepare one batch of my Royal Icing Recipe for Cookie Decorating.
- Divide the icing equally among four bowls. Using gel paste, tint one portion black, one pink, one purple, and leave remaining one white.
- Thin icing with lemon juice until it has the consistency of cool honey or hair gel. If you drizzle a ribbon of icing in to the bowl, it should be completely smooth in about 15 seconds.
- Transfer icings to squeeze bottles. If using piping tips, place a #1 or #2 tip on the white icing, and a #3 tip on the remaining icings.
Part 2: Decorate Your Butterfly Cookies!
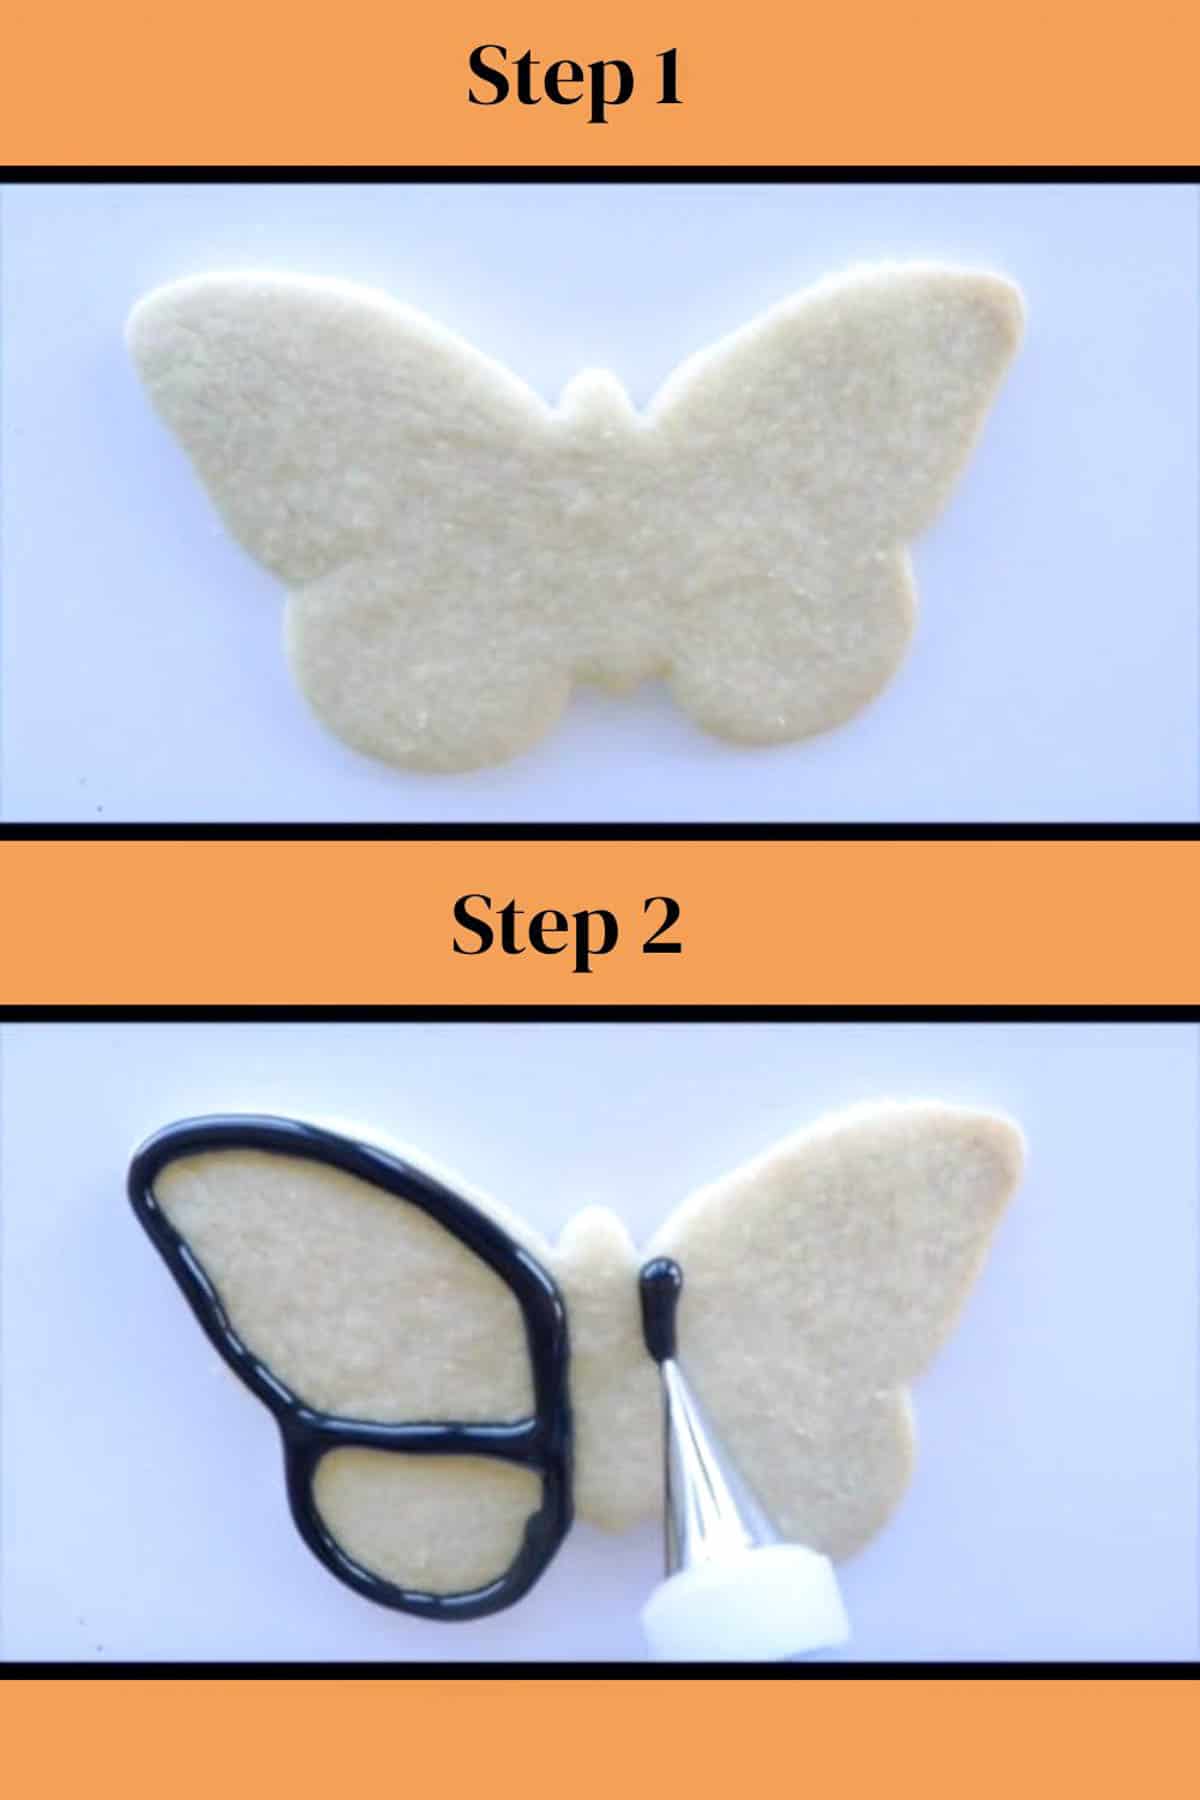
Step 1
Place an undecorated cookie on a work surface.
Step 2
Use the black icing to outline the upper and lower sections on the left wing of a butterfly.
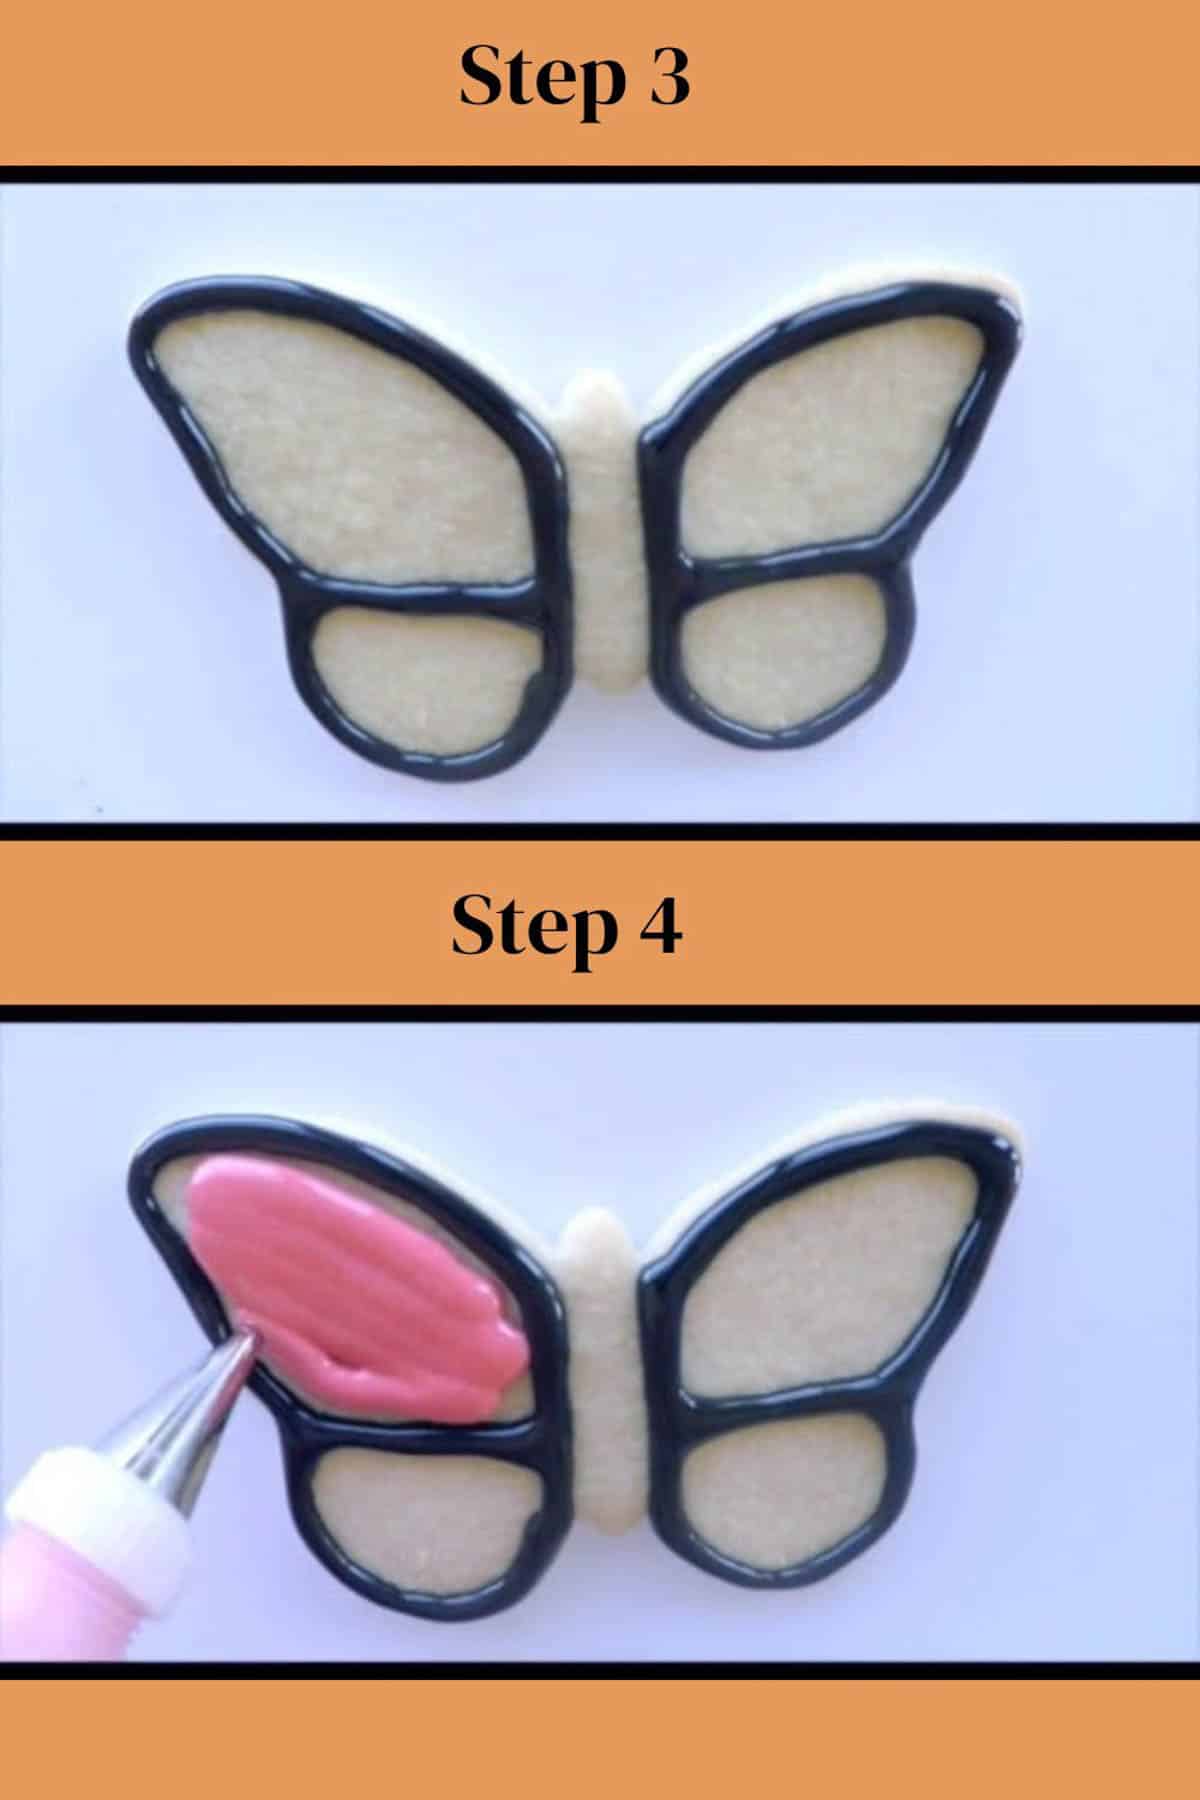
Step 3
Repeat on the right wing so that the cookie is fully outlined in four sections.
Step 4
Flood the upper left section of the butterfly with one of your colored icings (pink is shown in my example.) Carefully fill to the edges using a toothpick, cake tester or similar object as a guide.
Step 5
Repeat with the pink icing in the upper right section.
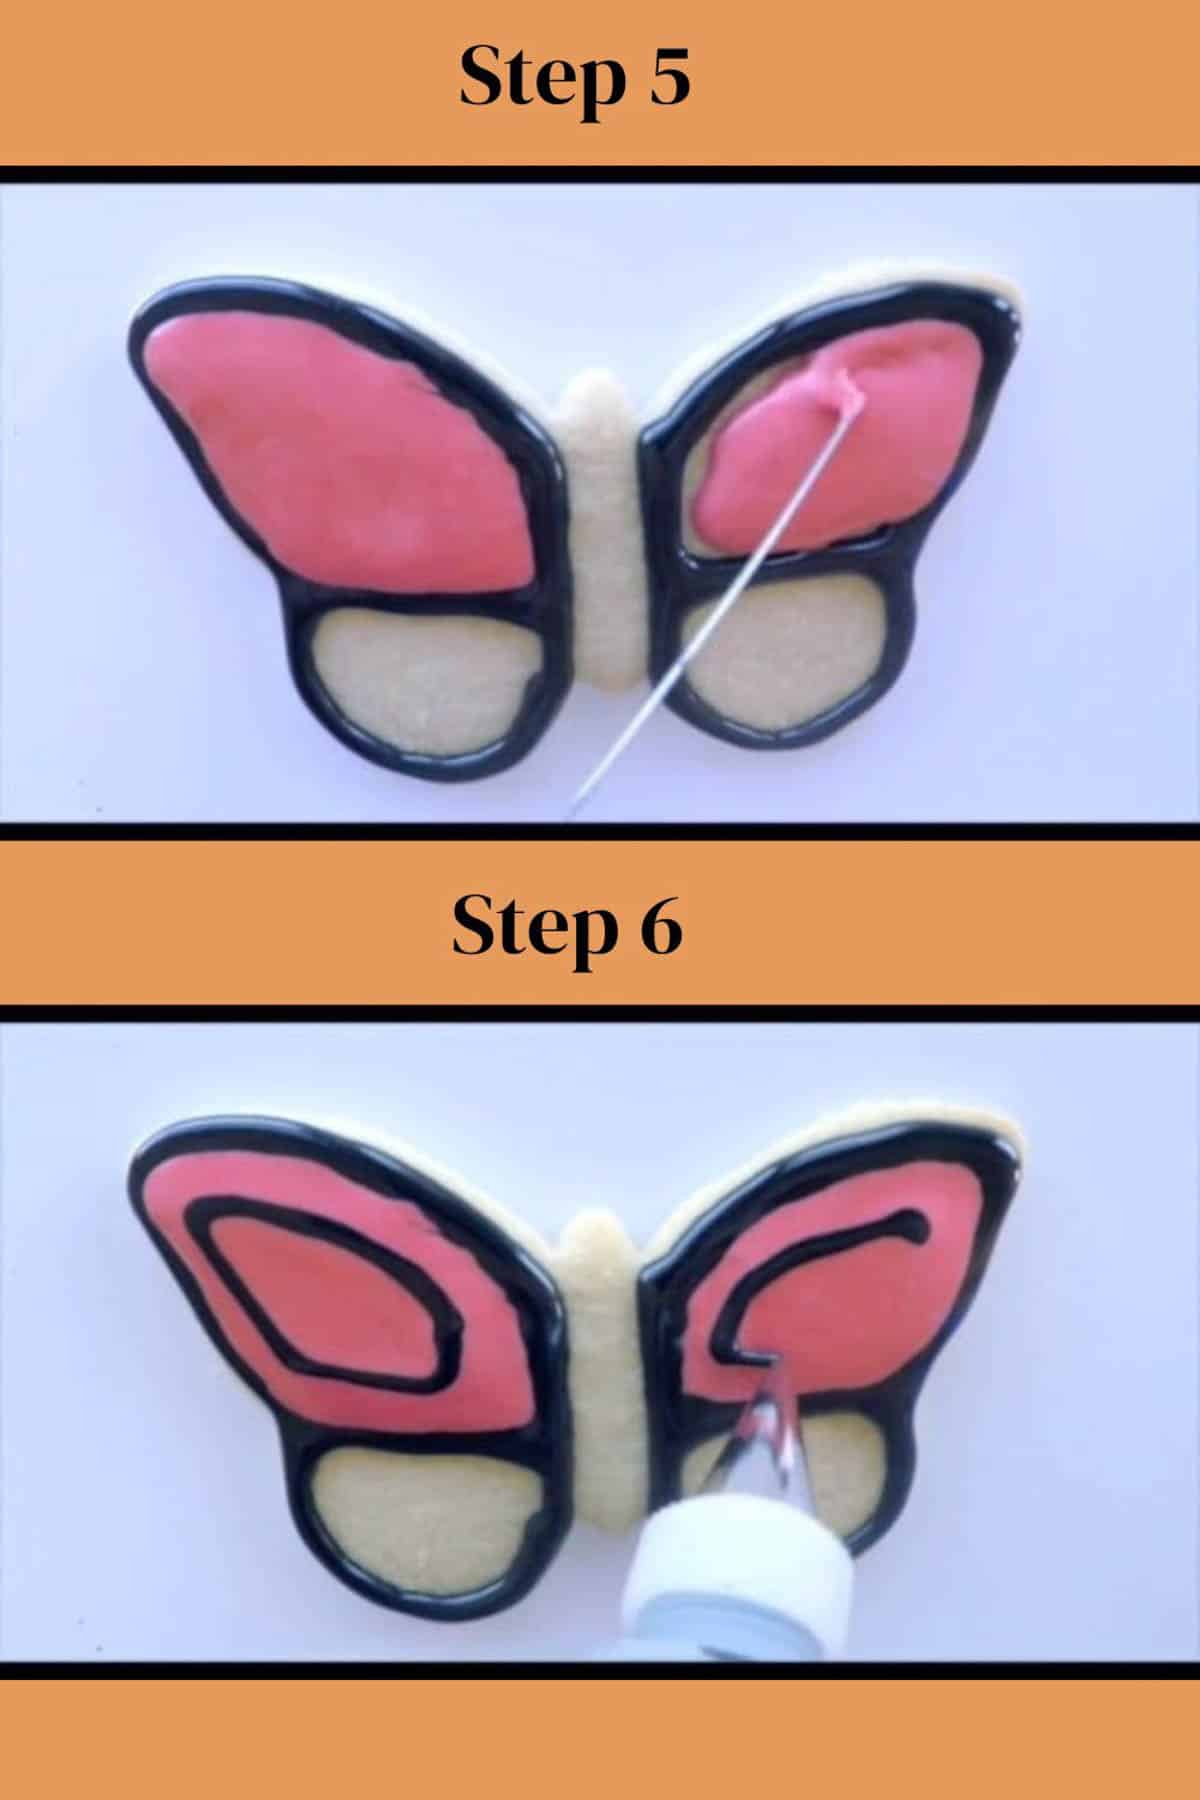
Step 6
Using black icing, pipe a line around the inside of both upper pink sections, following the contour of the outline.
Step 7
Use you cake tester/toothpick/etc. to draw lines inward, from the exterior black border through the interior black loop. Place the end of your toothpick on the outer black outline and drag it through the pink icing and inner black line, towards the center of the pink icing. Repeat several more times, working around the pink section in a counterclockwise direction, resulting in a beautiful wing design!
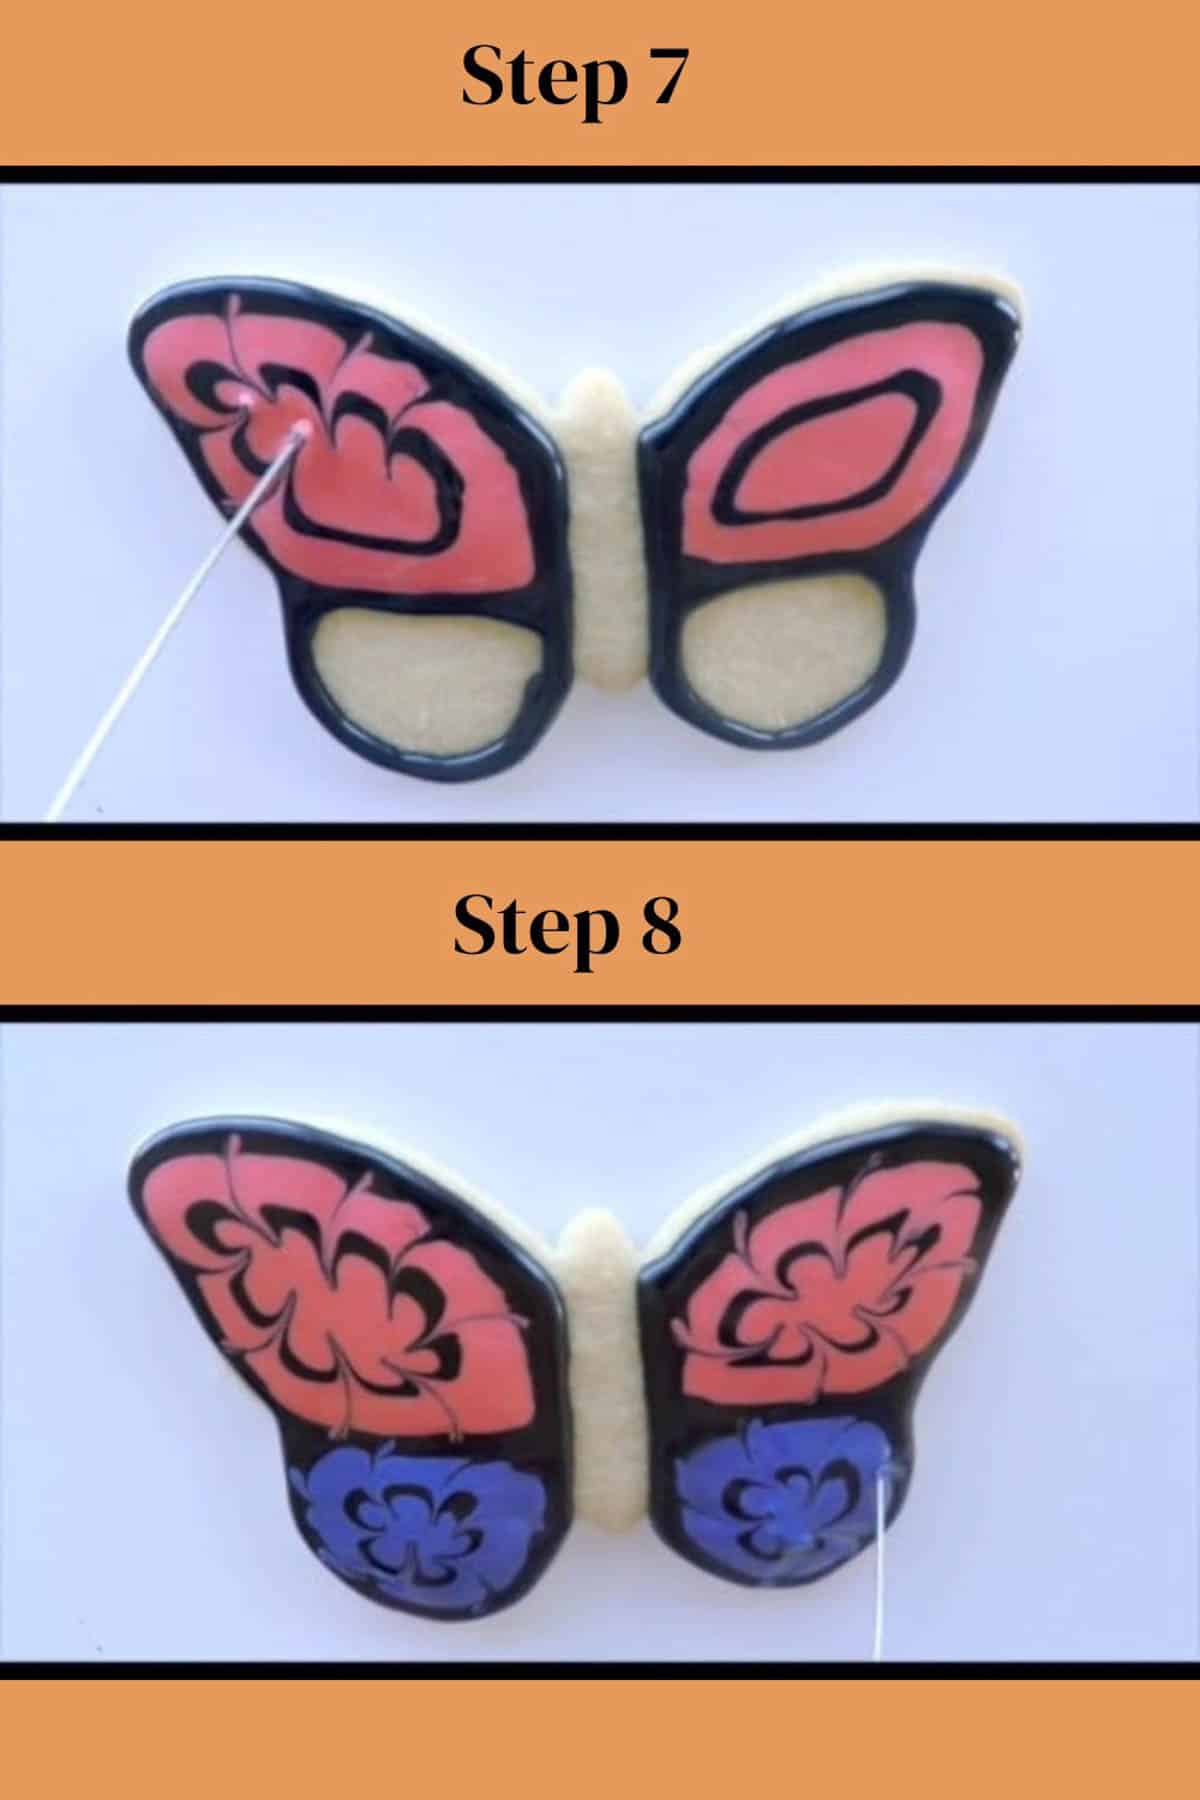
Step 8
Repeat steps 4-7 using a different base color (purple in my example) for the two bottom wing sections.
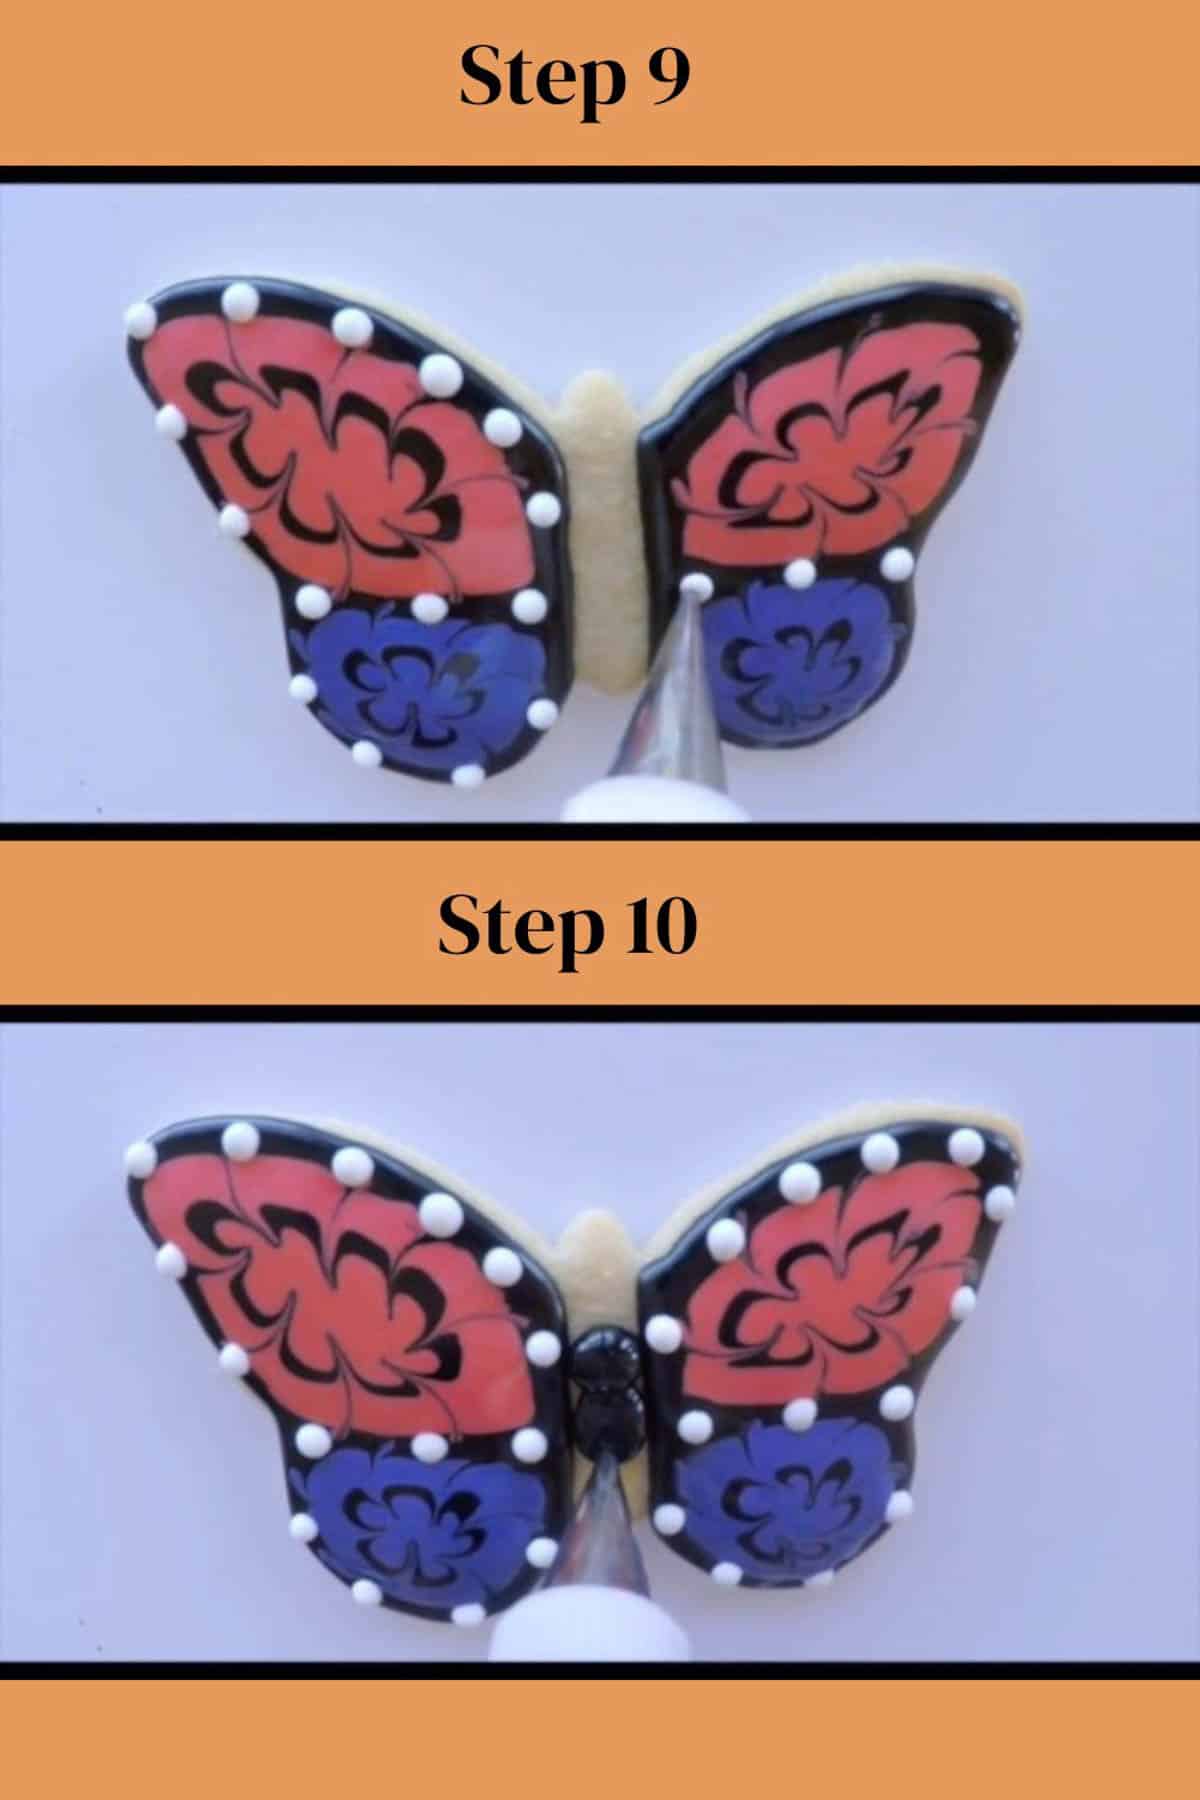
Step 9
Using the white icing, pipe dots on the black outline of the wings, spacing the dots evenly around the top wings, sides, and bottoms, as well as on the lines that divide the pink and purple sections.
Step 10
Using the black icing, pipe the butterfly's head in the center section, along with its long, thin body, attaching it to the wings.
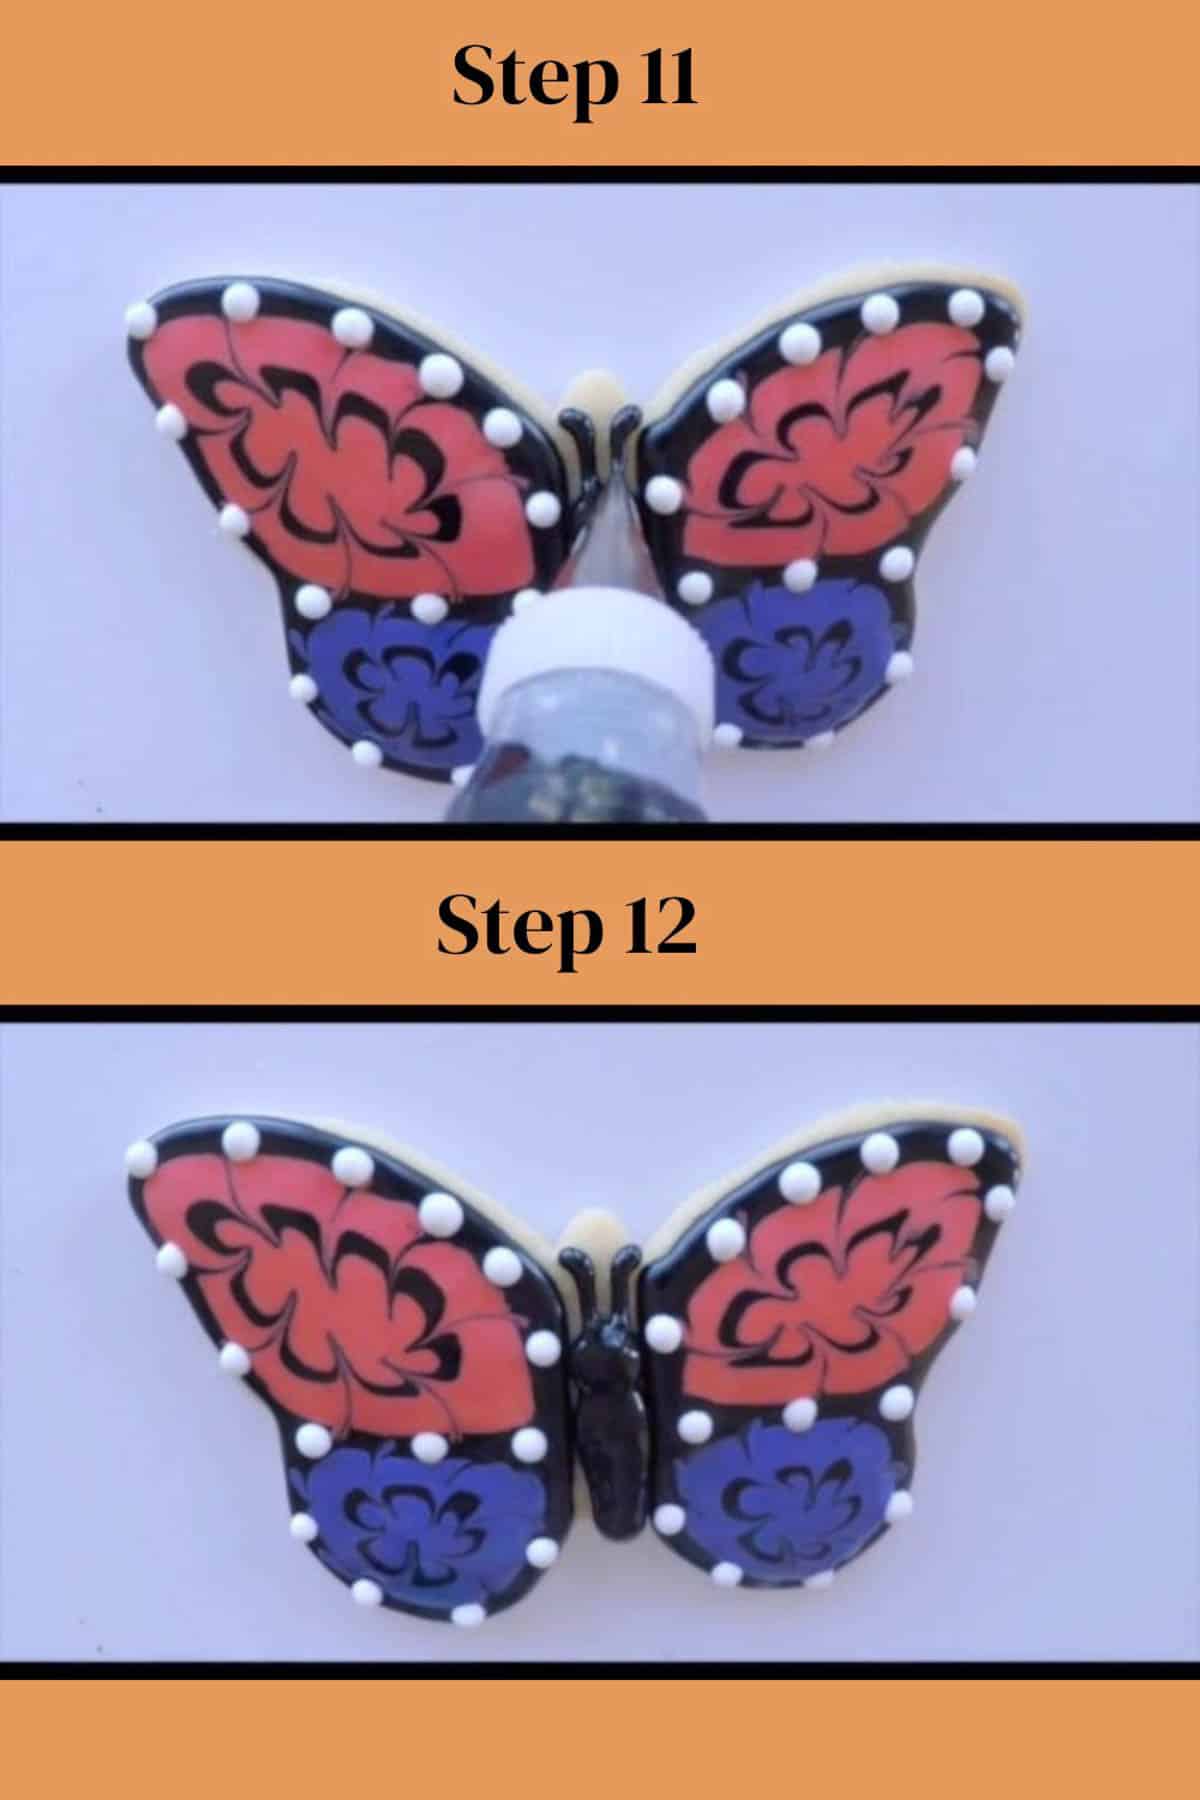
Step 11
Add two thin antennae on top of the head.
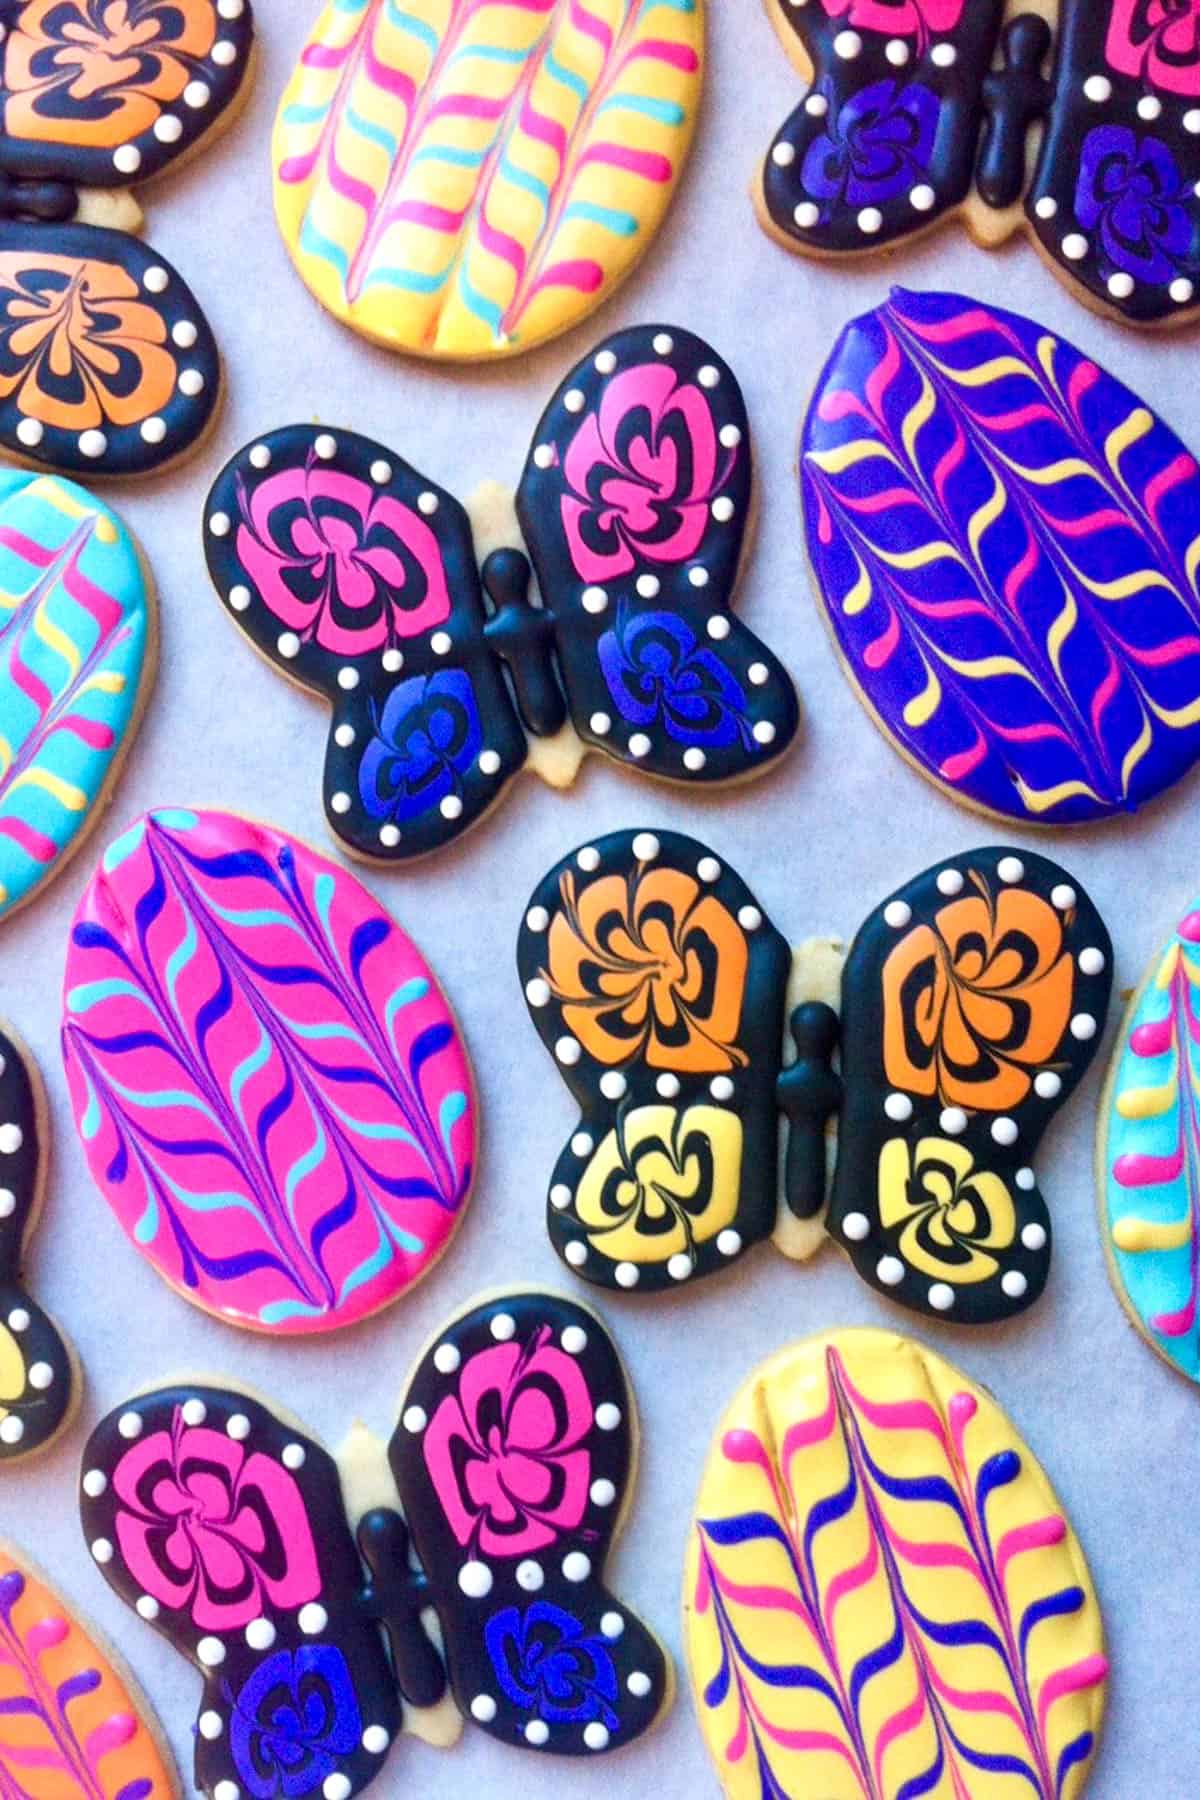
Step 12
TA-DA!! Repeat with the other undecorated cookies. Let the cookies dry 4-6 hours on a wire rack before serving, depending on how humid your kitchen is.
Would you like to save this?
Make ahead and Storage Instruction
- Make Ahead Options: Baked cookies or iced cookies can be stored at room temperature, sealed in a plastic bag or an airtight container, for up to one week. In some drier climates they last even longer, but humid climates cause cookies to have a shorter shelf life. Royal icing will keep for 1-2 days at room temperature or up to one week in a covered large bowl in the refrigerator. Be sure to rewhip icing right before using, as it can separate.
- Freezing Your Decorated Cookies: Once decorated, cookies can be frozen for up to 2 months. Let the icing set completely for 12-24 hours. Layer the cookies with parchment paper in single layers in an airtight container. To thaw, let the cookies come to room temperature inside the container before opening. This prevents condensation from ruining the icing.
Tips for Shipping Your Decorated Butterfly Cookies
- Let the cookies fully set (at least 24 hours)
- Individually package each cookie (cellophane or sealed plastic bags. ) Place parchment or waxed paper between cookies if stacking.
- Cushion with bubble wrap or foam.
- Choose a sturdy box (or double box for extra safety.)
- Label your package "FRAGILE or PERISHABLE" and "THIS SIDE UP!"
Butterfly Cookie Troubleshooting / FAQs
How Do I prevent Getting Little Bubbles in My Royal Icing?
Little bubbles in royal icing form due to air being incorporated while mixing. Here are some tips to prevent them:
- Mix at Low Speed: When making royal icing, mix on low speed for a few minutes at the end work out any air bubbles. High or medium speed mixing can trap air, creating bubbles.
- Let Icing Rest: After mixing, let the icing sit for 10-15 minutes before using it. This allows bubbles to rise to the surface, making them easier to remove.
- Stir Before Using: Instead of re-whipping, gently stir the icing with a spoon or spatula to break up bubbles without adding more air.
- "Pop and Smooth": After piping, use a toothpick or scribe tool to pop any visible bubbles before the icing starts to crust.
Why Did the Colors Bleed On My Decorated Cookie?
Bleeding colors on decorated cookies are usually caused by one or more of the following:
- Too Much Moisture: If your royal icing is too thin, the colors may spread and bleed into each other. Try using a slightly thicker consistency. High humidity can also cause colors to bleed. If you're in a humid environment, use a fan or dehumidifier to help icing dry faster.
- Over-Saturated Gel Colors: Using too much gel food coloring can lead to bleeding, especially with dark colors like red, black, or blue. Use a high-quality gel food color. Keep in mind that colors will darken as they dry.
- Oil Contamination: If there's grease from butter or shortening (on hands, surface, or piping bags), it can cause colors to spread. Make sure work surface and tools are grease-free.
More of My Favorite Recipes for Your Favorite Cookie Lovers
- How To Make Fun Football Cookies
- 4th of July Sugar Cookies
- Oatmeal Butterscotch Cookies (Scotchies)
- Cut Out Maple Sugar Cookies with Maple Buttercream
- Thick and Chewy Cowboy Cookies
Tried this recipe and loved it? Take a photo and tag me on Instagram or give it a review!

Decorated Butterfly Cookies with Easy Royal Icing
Equipment
- Butterfly Cookie Cutter (See Notes)
- 4 squeeze bottles
- 4 sets of couplers (see Ingredient and Equipment list, above)
- #1 or #2 and #3 piping tips
- toothpicks, pointed wooden skewers or a metal "scribing needle" (see photo in post)
Ingredients
- 1 recipe Vanilla Orange Sugar Cookies
- 1 recipe Royal Icing For Decorating Cookies
- Black, orange and yellow or pink and purple gel paste food coloring (see Ingredient and Equipment list, above)
- lemon juice
Would you like to save this?
Instructions
Prepare the Cookies and Icing
- Cut out and bake butterfly-shaped sugar cookies according to my Vanilla Orange Sugar Cookie Recipe (or another good sugar cookie recipe.)
- Prepare one batch for my Royal Icing Recipe for Cookie Decorating.
- Divide the icing equally among four bowls. Using the gel paste, tint one portion black, one portion pink, one portion purple, and leave the remaining portion white. (Note: The pink and purple icings are interchangeable with other colors, like orange and yellow, as shown in my photos.)
- Thin the icing with lemon juice, a few teaspoons at at time, stirring after each addition, until it has the consistency of cool honey or hair gel. If you drizzle a ribbon of icing in to the bowl, it should be completely smooth in about 15 seconds. (See my Royal Icing post for more details about this "two step" consistency.)
- Transfer all of the icings to squeeze bottles. If using piping tips, place a #1 or #2 tip on the white icing, and a #3 tip on the remaining icings.
Decorate the Cookies
- Working with one cookie at a time, use the black icing to outline the upper and lower sections on the left wing of a butterfly. Repeat on the right wing so that the cookie is fully outlined in four sections.
- Flood the upper left section of the butterfly with one of your colored icings (pink is shown in my example), followed by the upper right section.
- Using black icing, pipe a line around the inside of both upper pink sections, following the contour of the outline.
- Place the end of your toothpick on the outer black outline and drag it through the pink icing and inner black line, towards the center of the pink icing. Repeat several more times, working around the pink section in a counterclockwise direction. Do the same for the upper wing section.
- Repeat steps 2-4 for the bottom sections of the butterfly, using your second color (purple in my example.)
- Using the white icing, pipe dots on the black outline of the wings, spacing the dots evenly around the top, sides, and bottoms, as well as on the lines that divide the pink and purple sections.
- Using the black icing, pipe the butterfly's head in the center section, along with its long, thin body, attaching it to the wings. Add two thin antennae on top of the head.
- Repeat for all remaining sugar cookies. Let cookies dry at least 6 hours or overnight before serving.
Video
Notes
- For my decorated cookies that have details like these butterflies, I like to use a 3.5 to 5 inch cutter.
- Once decorated and dried, cookies will keep at room temperature for about 1 week (depending on your humidity levels.) Store them in an airtight container or tightly covered.
- Freeze decorated cookies for up to 2 months. Place them in single layers in an airtight container separated by parchment paper. Defrost cookies in the container (still covered) at room temperature so that condensation doesn't build up.

I'm loving the nip & tuck -- it looks great! And, I'm looking forward to more of your cookie creations in the future! 🙂
Thanks, Brett! A little nip and tuck never hurt any blog 🙂 Say "hi" to the chickens for me!
What a great layout!! Can't wait to see what is coming. Great job on the butterfly cookies. They are too pretty to eat. The video is so very helpful.
Thank you!! This is a monumental moment -- my very first blog comment from my mom! You are such a techie, now 🙂