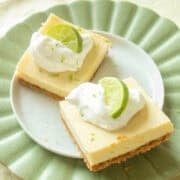
Key Lime Pie Bars with Graham Cracker Crust
Tart and creamy Key Lime Pie Bars are a dessert that even self-proclaimed "non-dessert people" (like my husband) enjoy. With a buttery graham cracker crust and a bright, zesty filling, they strike the perfect balance between sweet and tangy. These bars are simple to make, easy to slice, and ideal for everything from backyard barbecues to springtime birthdays and bake sales.
Why You Should Make Key Lime Pie Bars Instead of Pie
- Perfect crust to filling ratio: Even, flat squares, as opposed to slices, ensure that there is a better ratio of tart filling to buttery graham cracker crust.
- Simple, foolproof recipe: Both the crust and the filling are mixed by hand and pressed or poured into the baking pan--no fancy dish required. This is a great go-to weeknight dessert when you have limited time but still want to impress.
- Easy to cut and enjoy: Key lime pie bars are easier to portion into neat squares vs. pie slices, which can err on the messy side.
- They're portable! Handheld squares are perfect for parties, potlucks, or anytime you don’t want to fuss with plates and forks. And one batch makes up to 20 squares, which makes these bars better for feeding a crowd.
Pro Tips for Producing Perfect Key Lime Pie Bars
- Pack in the crust: Make sure the crust is packed into the pan evenly and firmly before baking so that it doesn't crumble much when you cut the bars. I like to use the bottom of a measuring cup, shown in my step-by-step photos below, to help with this task.
- Mix the filling well: The filling mixture should be evenly colored and smooth before you pour it into the pan, so that there are no unblended bits of egg or lime juice. Give it an extra whisk before you stop mixing, just to be sure!
- Look for baking cues: The custard is done baking when the edges are set and there is a slight jiggle in the center (it shouldn't slosh around.) It will set some more as the bars cool.
- Chill thoroughly: As much as you'll want to dive into the bars right away, you'll need to wait while they cool and then chill (sorry!) Allow at least 3 hours for completely chilled custard that is firm enough to cut into neat slices.
Ingredients and Special Equipment
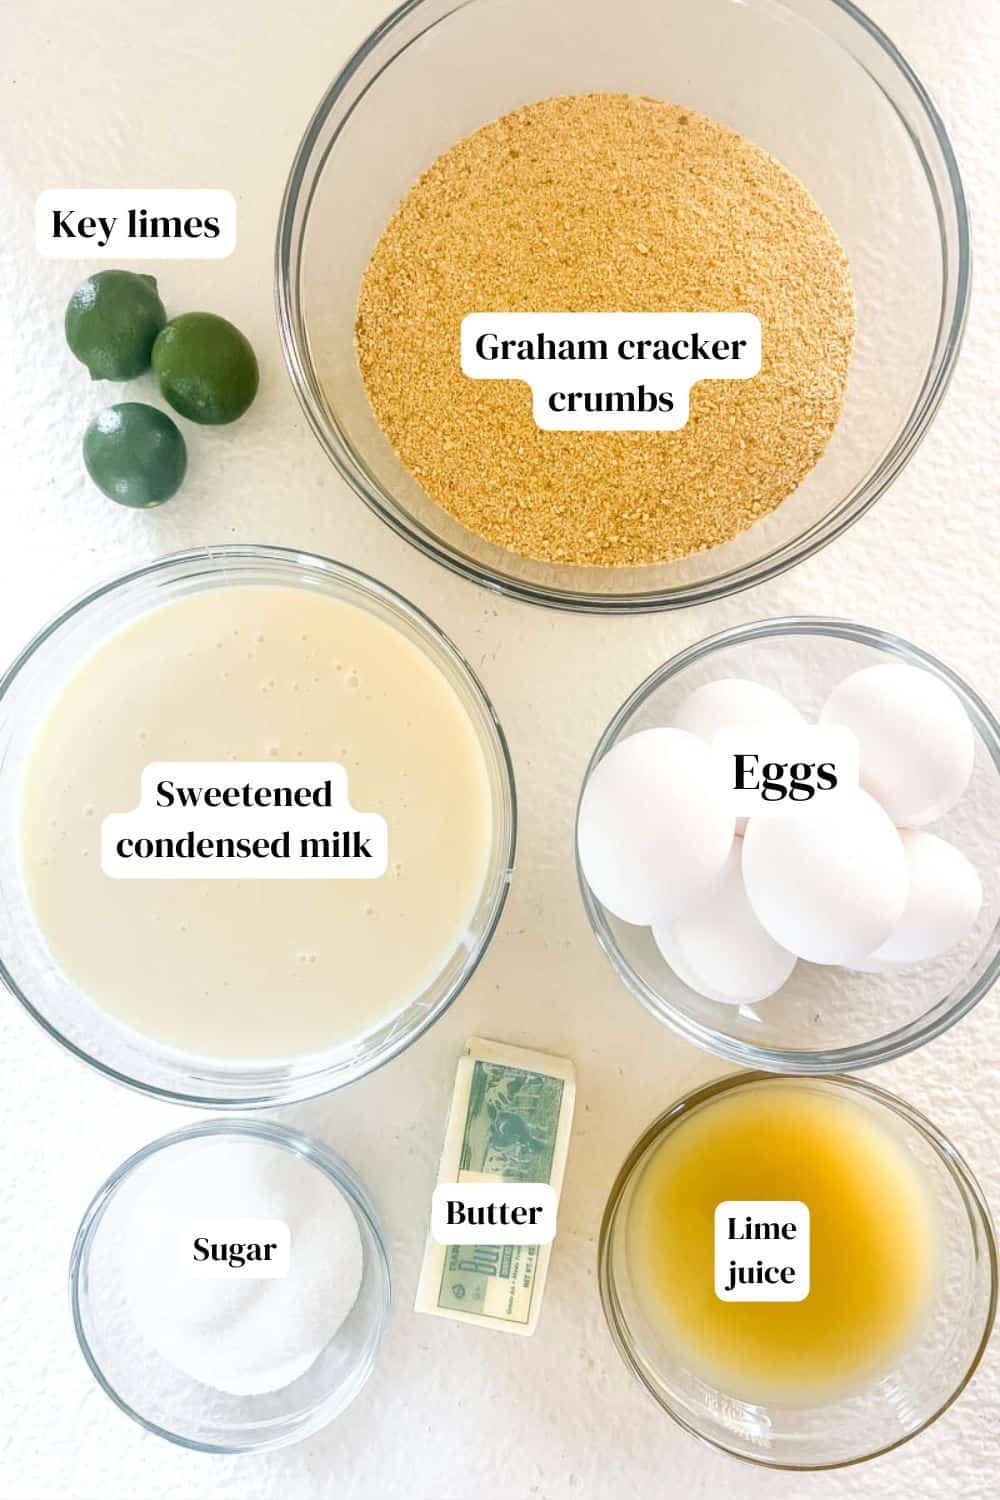
Graham Cracker Crust
- Graham crackers: You will need two cups of ground graham crackers, which is about 11-12 sheets. I also like to make this recipe using gingersnap crumbs, for a bit spicier, crisper crust.
- Granulated sugar
- Butter: Unsalted and melted.
Key Lime Pie Bars Filling
- Eggs: 3 whole large eggs and 3 large egg yolks.
- Key lime juice: You can substitute regular lime juice. I use a good quality bottled key lime juice vs. freshly squeezed. Key limes are quite small, so it would take many to yield 1 cup.
- Sweetened condensed milk: This recipe calls for two standard 14-ounce cans. Don't confuse this with evaporated milk, located right next to condensed milk in the baking aisle. Choose regular or low fat vs. nonfat varieties.
- Lime zest: Use key limes if you can find them, but regular limes work fine as well!
Recommended Special Equipment
- 9X13 inch baking pan: I've linked to one of my favorites here!
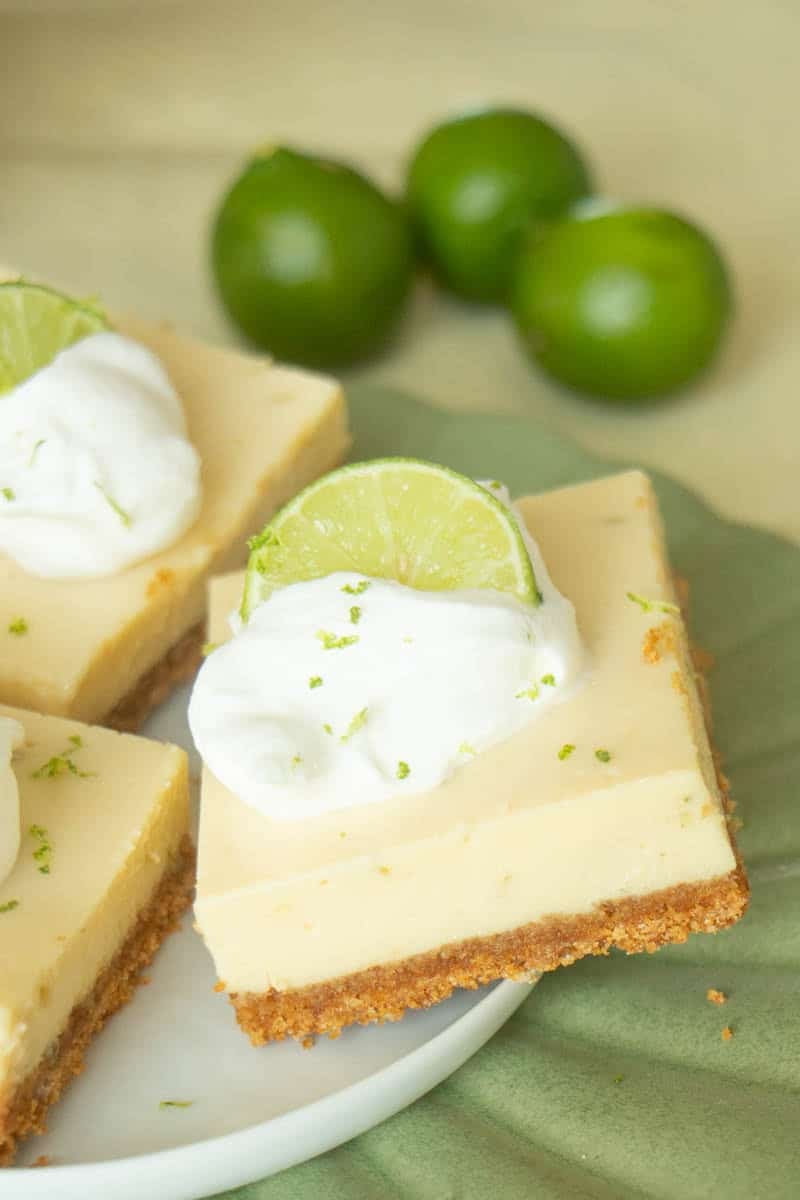
- Citrus grater / Microplane: One of my most-used kitchen tools and worth the investment. Adding zest to recipes not only adds flavor but, in this case, it sprinkles a pop of green color throughout the bars.
- Aluminum foil or parchment paper: For lining the baking pan.
Would you like to save this?
Step By Step Photos and Instructions
Prepare and Bake the Crust
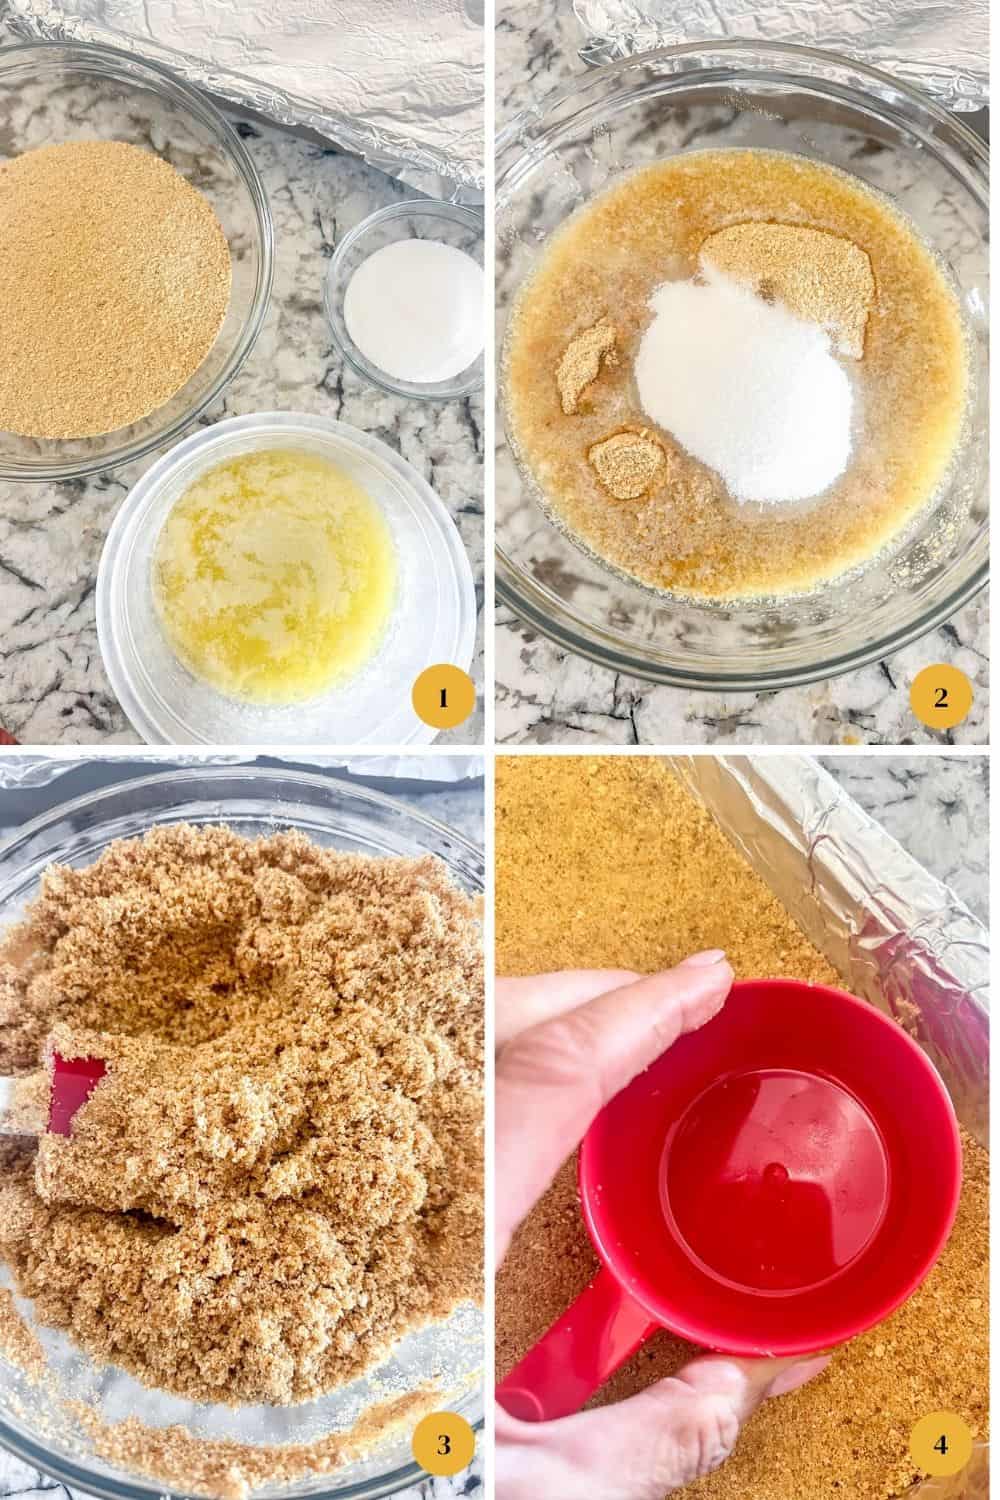
- Line a 9X13-inch baking pan with aluminum foil or parchment paper so that there is a 2-inch overhang. This will help you to lift the finished bars from the pan when they are chilled and ready to cut.
- Mix the graham cracker crumbs, butter, and sugar in a medium bowl.
- Make sure that the crumbs are evenly moistened--the mixture will be crumbly.
- Press the mixture in the bottom of the baking dish using either your fingers or the flat bottom of a measuring cup (I find this trick helps to evenly compress the crumbs.) Bake at 350F for 8-10 minutes, until fragrant and golden brown. Reduce oven to 325F and set the crust aside while you prepare the filling.
Mix the Key Lime Pie Bars filling and Bake
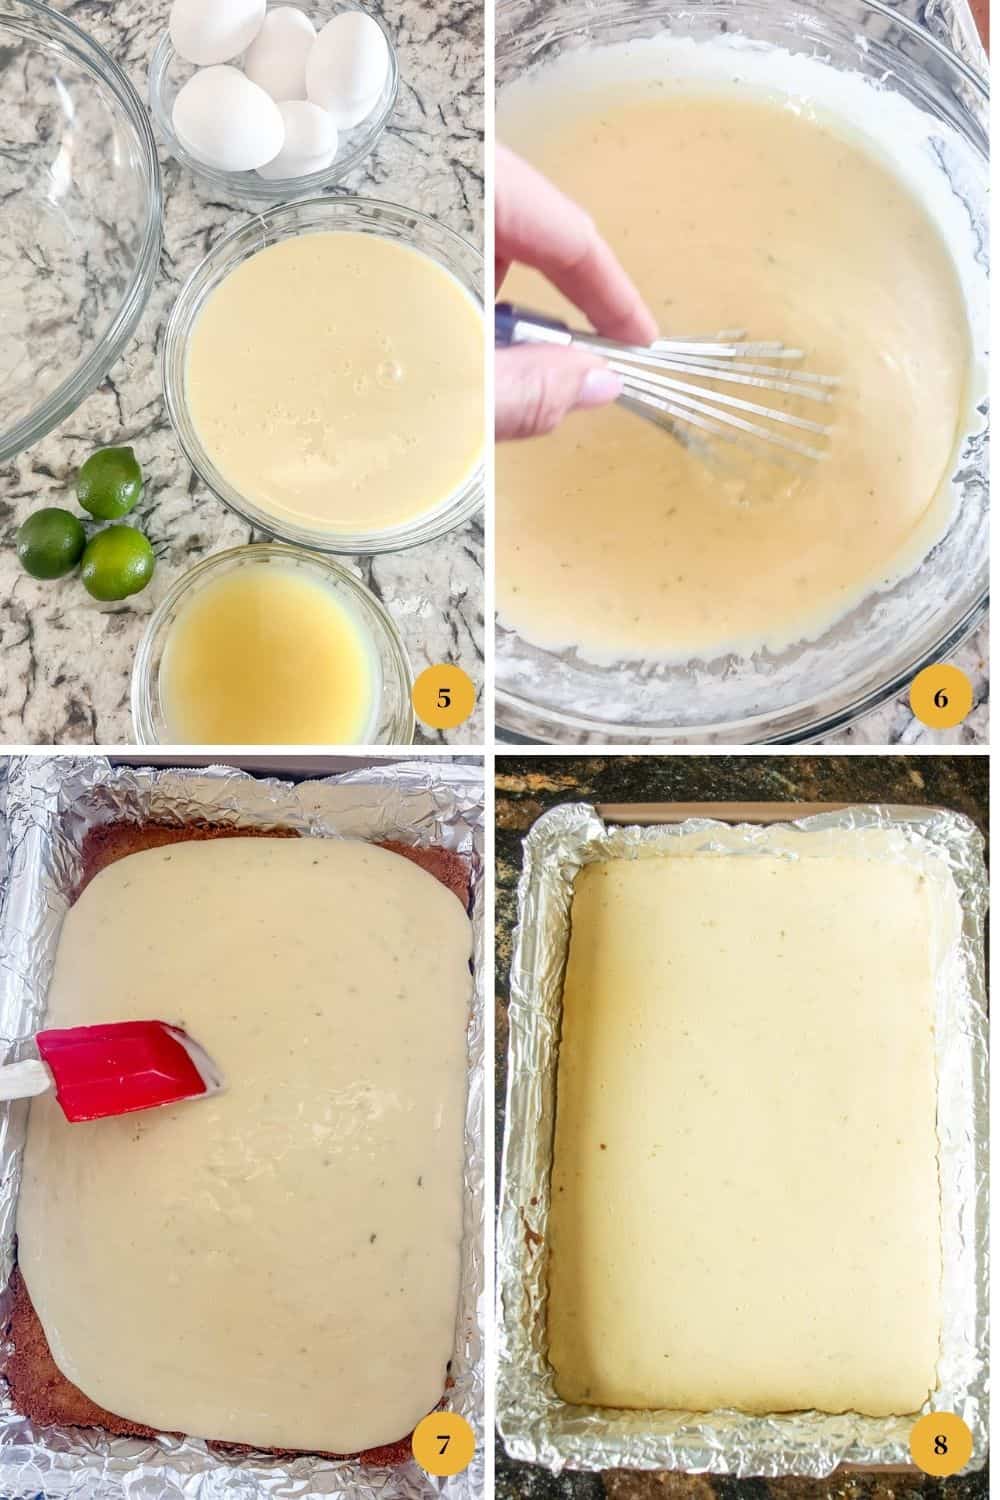
5-6: In a medium to large bowl, whisk the eggs, egg yolks, sweetened condensed milk, lime juice, and zest until thoroughly combined and smooth.
7. Pour the filling over the prepared crust, spreading evenly with a spatula or the back of a spoon.
8. Bake until the filling is set around the edges and only slightly jiggly in the middle, 18-22 minutes. Cool the pan completely on a wire rack.
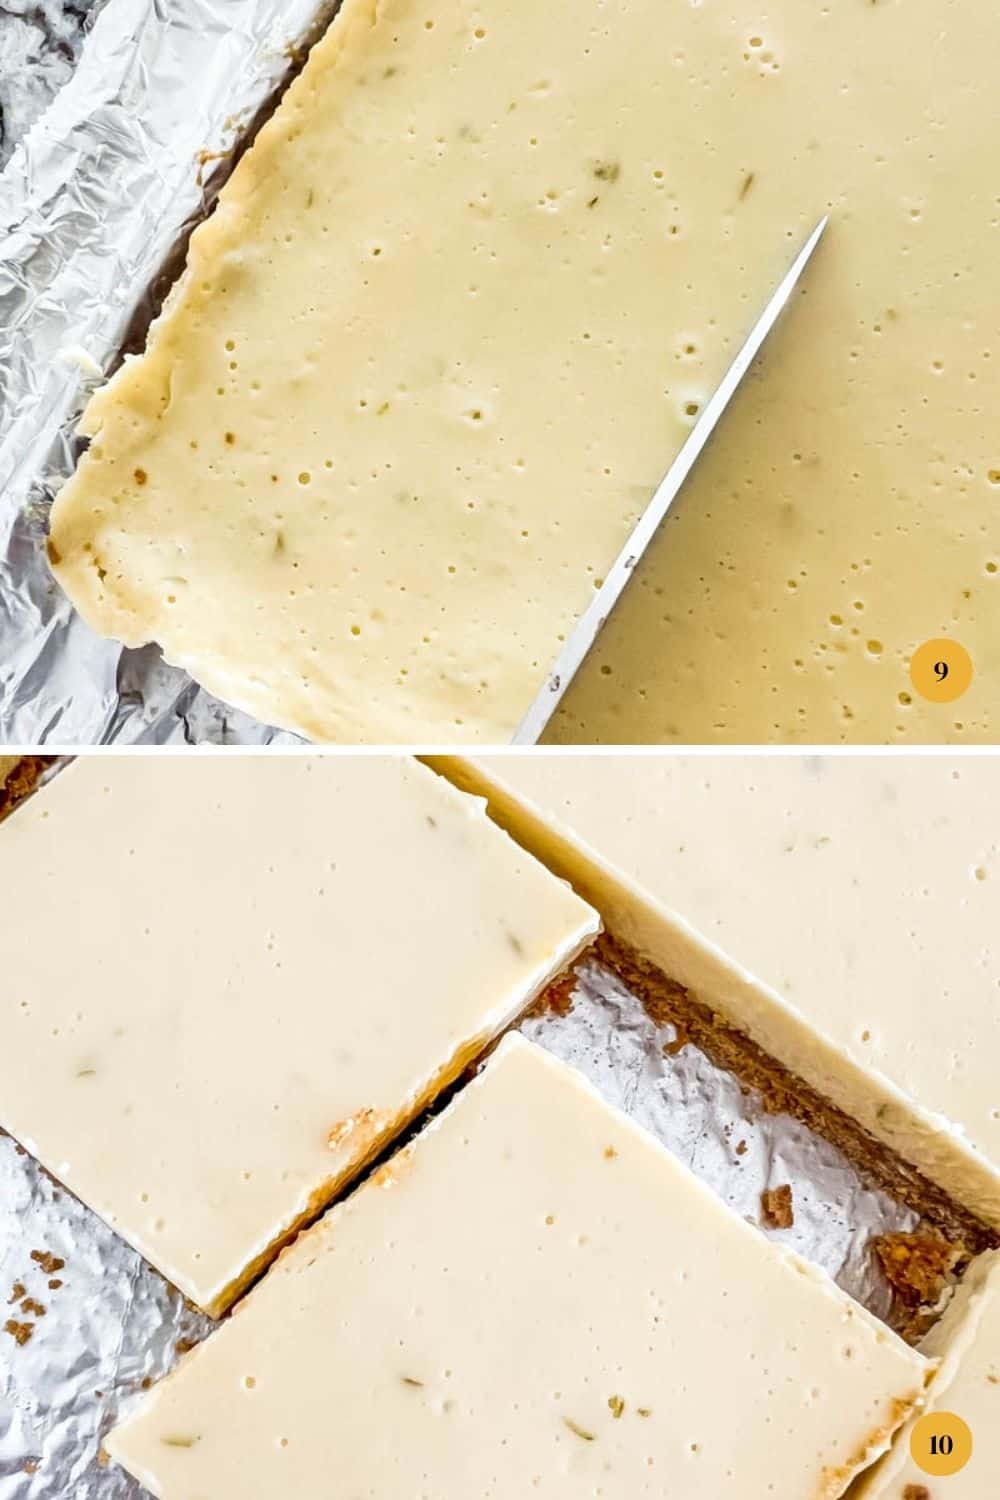
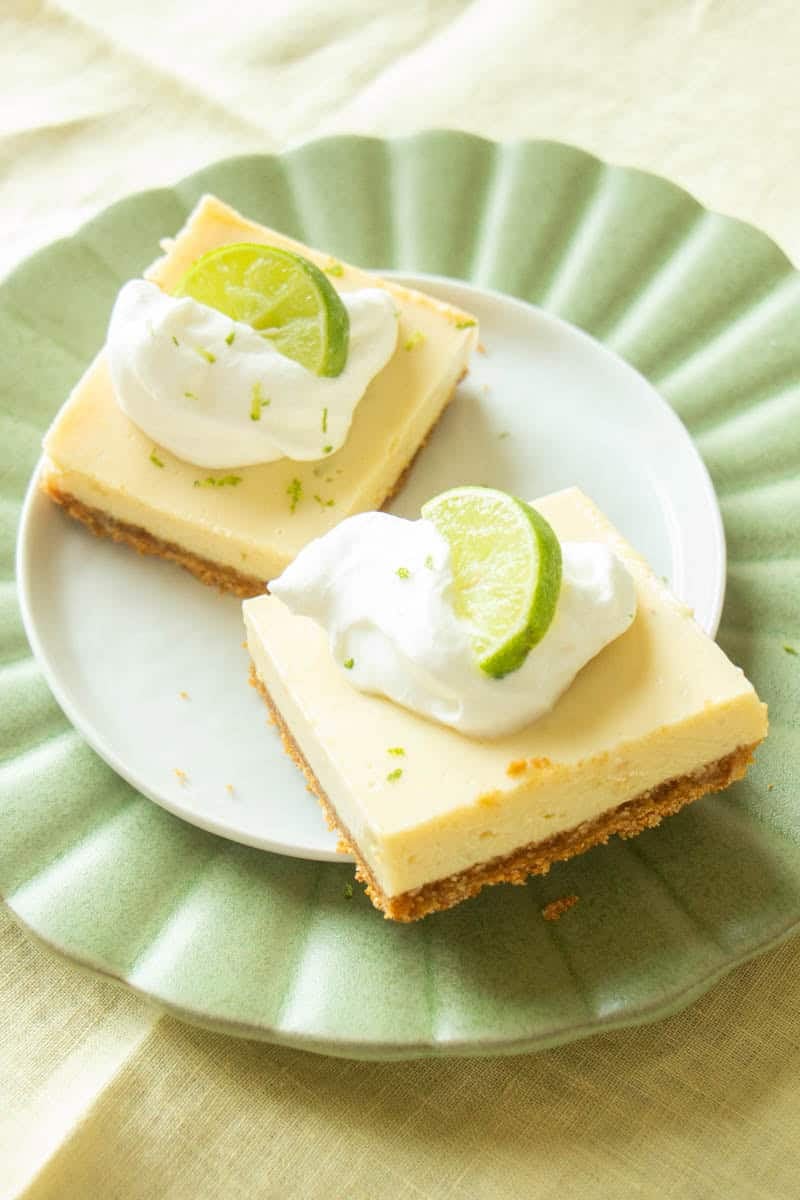
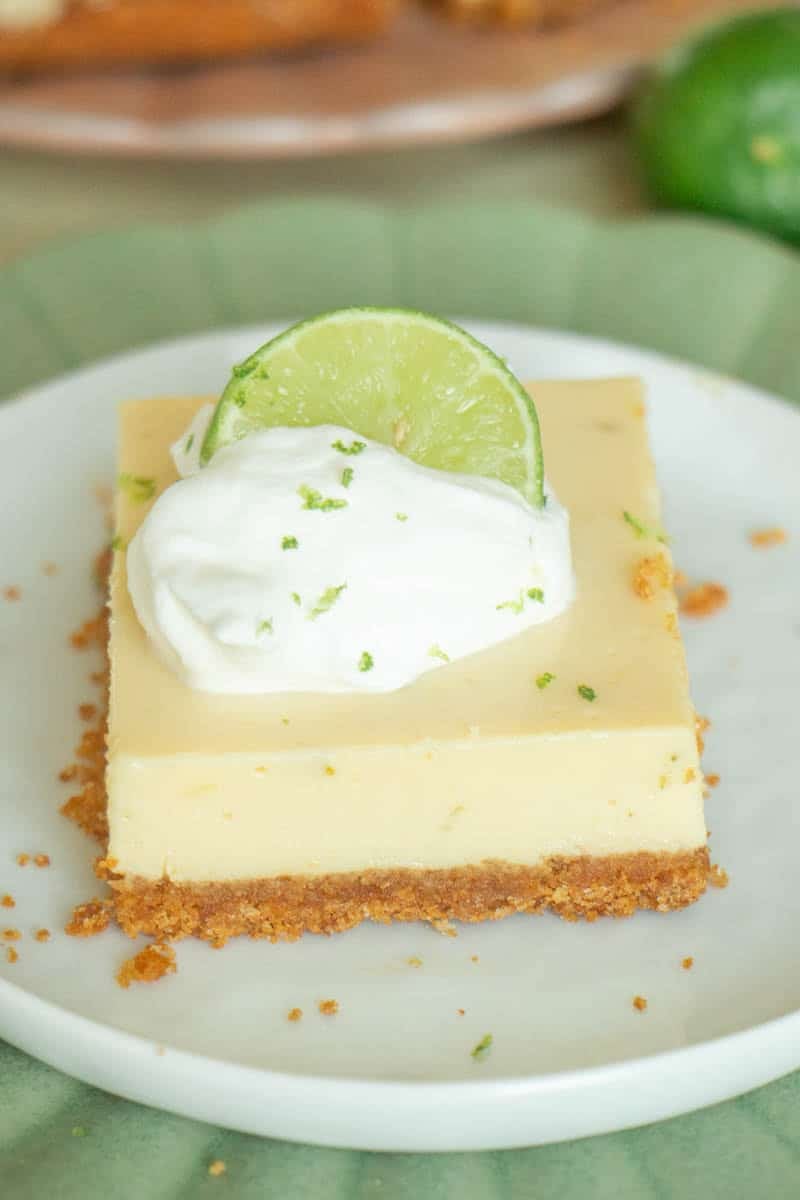
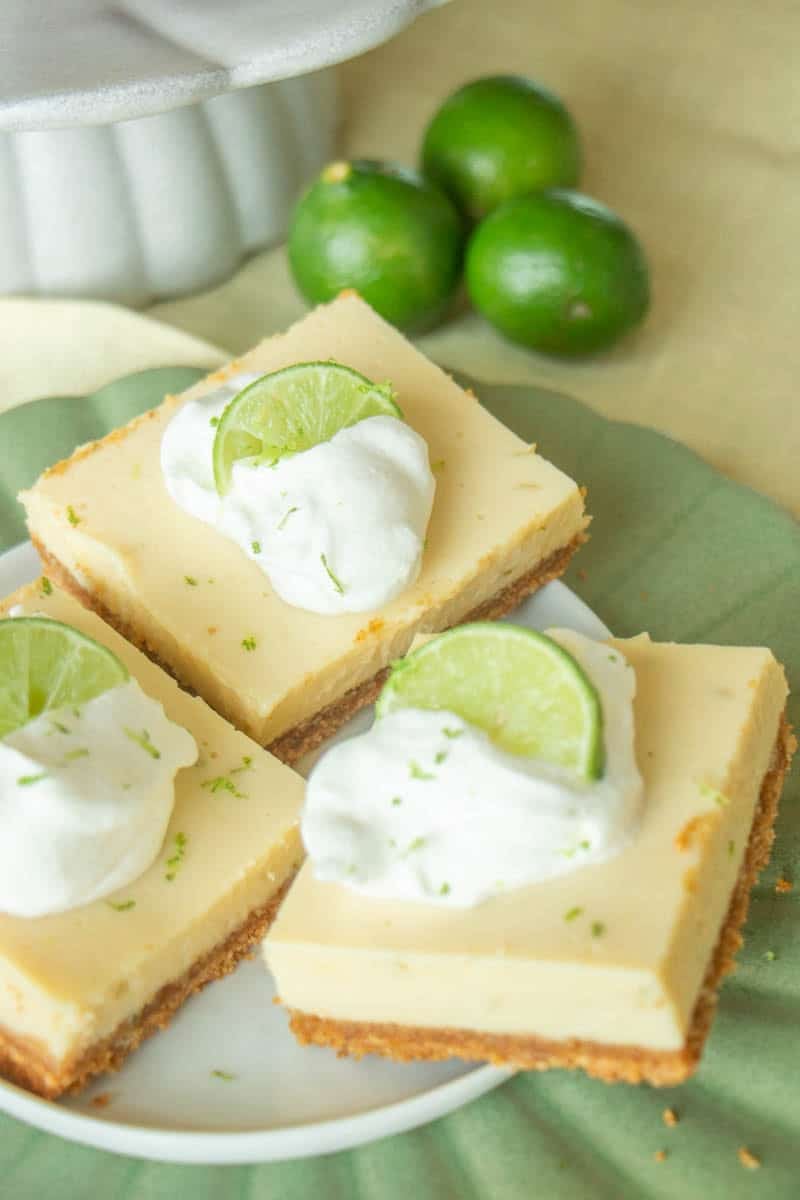
9-10: Cover the pan and refrigerate for at least 3 hours or until the filling is firm and very cold. Cut into squares using a clean, sharp knife (for extra-neat slices, rinse the knife in between cuts.) If desired, garnish squares with a dollop of lightly sweetened whipped cream, additional lime zest, and a small lime wedge. Serve chilled.
Make Ahead and Storage Instructions
- Make Ahead: Key Lime Pie Bars are the perfect recipe to make ahead of time. They need to chill for at least 3 hours in the refrigerator before slicing, but chilling them overnight is even better for creating a cold and creamy texture. It lets the flavors meld, and fully chilled bars are easier to slice into neat squares.
- Storage: Store the bars in an airtight container for up to 4 days. Believe it or not, you can freeze them for up to 2 months. Wrap the bars tightly in plastic wrap and then foil before freezing. Thaw in the fridge overnight before adding the garnishes and serving.
Troubleshooting / FAQs
How Do I Cut Key Lime Pie Bars into Neat Slices?
In order to get neat, clean slices, the custard must be very firm and cold, so the first step is to chill the bars properly, at least 3 hours or overnight. Use a sharp chef's knife (not serrated) to cut. Run the knife under hot water and then wipe it before slicing. Repeat this with each cut.....a bit tedious, but it does the trick!
Why Is My Pie Filling Runny?
There are a few reasons why your custard filling is too runny. One is not enough chilling time. Custards need several hours to set up and chill all the way through. Another reason is underbaking. The center should be only slightly jiggly when you remove the pan from the oven.
My Baked custard Filling Looks Curdled or Cracked
If you leave the custard in your oven for too long, it will curdle or crack while setting. Pull it from the oven when the center has a slight jiggle to it, and the remainder will set from residual heat. This is also why the oven temperature is reduced a bit after the crust bakes.
Half-a-Dozen More of My favorite Portable Sweet Treats
- Oatmeal Butterscotch Cookies (Scotchies)
- Rich and Fudgy Chocolate Brownies
- Thick and Chewy Cowboy Cookies
- Vanilla Orange Sugar Cookies
- Triple Chocolate Cherry Cookies
- Easy Key Lime Cookies
Tried this recipe and loved it? Take a photo and tag me on Instagram or give it a review!
Key Lime Pie Bars with Graham Cracker Crusts
Equipment
- 1 9X13 baking pan (I love the one I've linked here!)
- parchment paper or aluminum foil
Ingredients
Graham Cracker Crust
- 2 cups finely ground graham cracker crumbs (See Notes)
- ¼ cup granulated sugar
- 8 tablespoon unsalted butter, melted
Key Lime Pie Bar Filling
- 3 large eggs
- 3 large egg yolks
- 2 (14-ounce) cans sweetened condensed milk
- 1 cup key lime juice
- 2` teaspoon finely grated lime zest
Optional Toppings / Garnish
- Lightly sweetened whipped cream
- Additional lime zest and lime slices
Would you like to save this?
Instructions
Prepare the Crust
- Preheat your oven to 350℉. Line a 9X13-inch baking dish with aluminum foil or parchment paper so that it extends 2-inches beyond the ends of the pan. This will help you lift the bars out of the pan once they are ready to cut into squares.
- Combine the graham cracker crumbs, sugar, and melted butter in a medium bowl until all of the crumbs are moistened. Press the mixture firmly and evenly in the bottom of the baking dish using either your fingers or the flat bottom of a measuring cup (as shown in the Step by Step photos, above.)
- Bake the crust for 8-10 minutes, until golden brown. Reduce oven to 325℉ and set the crust aside while you prepare the filling.
Prepare the Filling and Bake
- In a medium to large bowl, whisk the eggs, egg yolks, sweetened condensed milk, lime juice, and zest until thoroughly combined and smooth. Pour the filling over the prepared crust, spreading evenly with a spatula or the back of a spoon.
- Bake until the filling is set around the edges and only slightly jiggly in the middle, 18-22 minutes. Cool the pan completely on a wire rack.
- Cover the pan and refrigerate for at least 3 hours or until the filling is firm and very cold. Cut into squares using a clean, sharp knife (for extra neat slices, rinse the knife in between cuts.)
- If desired, garnish squares with a dollop of lightly sweetened whipped cream, additional lime zest, and a small lime wedge. Serve chilled.
Notes
- You should need 11-12 whole graham cracker sheets to yield 2 cups of crumbs.
- This recipe also works really well using finely ground gingersnap crumbs. The crust will be a little more crisp than the one using graham crackers.
- Store leftover bars in a single layer in the refrigerator, covered with foil or in an airtight container.

Hi Julie! Do you have to wait till the doughnut cools before piping in the custard?
Hi Elyse! I think that it is best to wait until the doughnut cools before piping the custard in order to maintain the consistency, as warmed custard will be runny and a bit messy. That said, you can still pipe the custard and then wait for the doughnut to cool afterward, and the custard will thicken as it cools. Hope this helps -- thanks!
these sound yummy! i love key lime.
Thanks so much, Dina! Me too 🙂
Hooray for real fried donuts! And with filling. And glaze. These are just incredible. I have made plain fried donuts before but never anything this decadent. I need to make these!
Thanks so much, Erin! I've made baked donuts too, but there's just something about a good old-fashioned fried donut with glaze..... So glad that you enjoyed the recipe!
These sound like the real deal. I would love a few of these. I bet I could eat the filling by the spoonful!.
Thank you, Laura! I did keep dipping into the filling.....and the glaze.