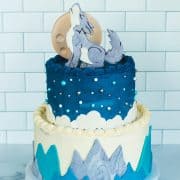
Wolf Cake
People will "howl" when you create this colorful two-tiered Wolf Cake via achievable step-by-step photos and instructions. It makes a great themed cake for a birthday party or shower.
Ingredients
- 24 cups cake batter
- 16 cups buttercream (Swiss meringue or American buttercream)
- white fondant
- gel paste food coloring (blue, light blue, black, ivory, green)
- edible pearls or beads
Instructions
Day 1
- Bake three 8-inch cake rounds and three 10-inch cake rounds using your favorite cake recipe (such as My Favorite Chocolate Cake Recipe .) You will need about 9 cups of batter for the 8-inch rounds and 15 cups for the 10-inch rounds. Cool completely and then wrap each round in plastic wrap.
- Wolf: Using a cutter like this one, cut out gray and white fondant shapes and stick them together as shown using either water or edible "food glue." The gray section should be between ¼ and ½ inch thick so that it is study enough to stand up, once dried. You can also form a wolf shape by hand (see Notes.)
- Moon: Roll out ivory tinted fondant to between ¼ and ½ inch thick. Cut a 4-inch circle from the fondant. Use a round fondant tool to create craters in the moon. Let pieces dry overnight or longer to firm up. Once the pieces are firm enough, stick toothpicks or skewers in the bottoms, which will be used to attach the pieces to the cake.
Day 2
- Prepare a buttercream, such as a Swiss meringue buttercream or my easy White Chocolate Buttercream . You will need about 16 cups of buttercream for the two-tiered cake.
- Place one of the 10-inch cake layers on a cake board or serving plate, securing it with a dab of buttercream. Pipe or spread about 1½ cups buttercream evenly on top. Place a second layer on top of the first and spread it with 1½ cups buttercream. Top it with the third cake layer and spread an even, thin coat of buttercream over the entire cake tier. Chill for at least 20 minutes to set the buttercream. This is your "crumb coat."
- Place one of the 8-inch cake layers on a cardboard cake round, securing it with a dab of buttercream. Pipe or spread about 1 cup buttercream evenly on top. Place a second layer on top of the first and spread it with 1 cup buttercream. Top it with the third cake layer and spread an even, thin coat of blue-colored buttercream over the entire cake tier to form a crumb coat. Chill for at least 20 minutes.
- Once the tiers are chilled, apply a second thicker coat of the buttercream to each (blue buttercream for the 8-inch tier.) Use an offset spatula or a cake scraper to smooth the tops and sides. Chill 20 minutes.
- Measure the top of the bottom (10-inch) tier to find the center. Cut two dowels to the height of the tier and insert them on either side of the center. These will be used to hold up the top tier. Cut a third dowel about 3 inches taller than the bottom tier and insert it directly in the center of the cake.
- Carefully slide the top tier over the center dowel, fitting it into the hole in the center of the cake board that is underneath the top tier.
- Roll out white fondant to about a ⅛ inch thickness. Use cloud shaped cutters to cut out clouds, or cut them out by hand using a paring knife. Place the clouds around the bottom of the top tier, adhering with water or food-safe adhesive.
- Place edible pearls (blue, silver and white are all good colors) around the top tier to look like stars in the sky.
- Roll out blue, aqua and gray fondants to about ⅛ inch thickness. Cut out mountain shapes of various heights using all three colors. Attach the mountain shapes to the bottom tier, overlapping and alternating colors.
- Using white buttercream and a piping bag fitted with a large star tip (such as a #32 tip), pipe a shell border around the bottom tier. Do the same around the top tier with blue buttercream.
- Attach the dried fondant wolf and moon (and tree if desired) to the top of the wolf cake.
Video
Notes
- Fondant cutters: If you don't want to make the investment in fondant cutters for this cake, you can form your shapes freehand! Use a food-safe marker to trace shapes on the fondant and cut them out. You can also print out the shape of a wolf, clouds, mountains, etc, and use those as guides for tracing. If you don't have a 4-inch cutter for the moon shape, find a small plate or a mug to trace.
- As noted in the instructions, it is easiest to take your time with cake projects such as this one and make it over a two (or even three) day period. Bake the cake layers and form the top fondant pieces on day one, so that they have time to rest and dry. Assemble and decorate on day two.
Did You Make This Recipe?Please leave a comment below or pin it to your Pinterest account!