Wolf Cake
My friend's sweet daughter, Layla, turned seven last week. She asked if I would make her birthday cake for her, a task that I am always happy to help with. When I asked her what flavor she wanted, she responded "funfetti." No surprise there. When I asked her what design she wanted, she said "I really, really, really want.....a wolf cake."

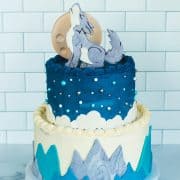
A wolf cake?? Not what I expected. Rainbows, unicorns, or mermaids? Yes, I've done tons of those. But a wolf cake request was new to me. That said, if Layla wanted a wolf cake, then Layla was going to get a wolf cake! So, I got to work researching some ideas, and this is what resulted: two funfetti tiers (10-inch and 8-inch) topped with Swiss meringue buttercream and wolf-inspired fondant decorations. I completed the project slowly, over a two day period, so as to not be rushed or overwhelmed.
I was really happy with the results, but more importantly, Layla was happy with the results, which is all that really matters.

Why you will howl for this Wolf Cake
- Step by step instructions: I know, I know. Cake tiers, fondant, buttercream: these things can all be kind of intimidating. If you've always wanted to try your hand at a tiered party cake, now's your chance! I know you can do it. Below are the tools that I suggest along with step by step photos and instructions to help you along the way (and if you have a question, just ask!)
- So many options: You can use your favorite, most reliable cake (even a boxed cake), a fancy Swiss meringue or an American buttercream, and you can shape your own fondant pieces or use cut-outs. Want to do a star border instead of a shell border? Be my guest. Want to do only one tier? That works, too!
- It's customizable: Yes, this was a wolf cake theme, but the base of this cake could work for a variety of animals (bears, deer, and elk, oh my!) It could also be turned into a "camping" cake, a "skiing" cake, or a cake for someone who loves the great outdoors.
- Homemade is better (and cheaper): Have you seen the price of custom tiered bakery cakes, lately? Yikes. Even if your cake might not turn out as perfectly flawless as a professional baker's version, I assure you that a homemade cake will be much more appreciated....and give you a great sense of accomplishment!
Ingredients, tools and equipment
Suggested helpful tools that I use to make this wolf cake and all of my decorated cakes.

- Cake pans: For this recipe, I used 10-inch and 8-inch cake rounds to make the two tiers, each with three layers.
- Nonstick baking spray: My favorite brands are Pam for Baking or Baker's Joy.
- Parchment paper (optional): Lining the cake pans with parchment rounds is an additional way to ensure that cake layers don't stick after baking.
- Fondant: You can either use only white fondant and color it with gel paste, or buy pre-colored fondant.
- Tylose powder and/or cornstarch: Tylose powder, when mixed with fondant, helps to firm it up faster than just air-drying. The more you use, the faster it will harden. Cornstarch helps with the rolling process by keeping the fondant from sticking to surfaces. You can also add cornstarch to the fondant when mixing in colors to help keep it from sticking.
- Food coloring: I prefer using gel paste food colors versus the liquid version for two reasons: First, the gel paste produces, richer, more vibrant colors using less product than the liquid. Second, the liquid can affect the consistency of the fondant, as you need to use more the achieve your desired color.
- Rubber gloves: These come in handy when you are mixing food coloring into the fondant, so that you don't color your hands! You can find these in the cleaning supply section of your grocery store.
- Cake boards: Good for stacking cake tiers and storing cake layers after they cool. I used 8-inch and 10-inch boards for this cake. Look for boards that have a perforated hole in the center, so you can insert the cake dowel in the middle.
- Cake drums: These are optional, but they are sturdy round or square bases on which you can build and transport your cake. You can also use a flat plate or platter.
- Turntable: While not necessary, turntables make frosting and decorating cakes much easier. I use a fairly inexpensive one like this one here. An alternative is to frost the cake on a plate and turn it by hand.
- Toothpicks or wooden skewers: Stick these into the fondant decorations so you can secure them on the cake.
- Wolf, cloud, tree, mountain, and round cutters (optional): All available via JB Cutters.
- Fondant tools: Useful for shaping fondant decorations like the moon craters.
- Offset spatulas and/or a cake scraper for smoothing the sides of the cake tiers
- Cake dowels: Used to keep the top tier from sinking into the bottom tier
- Edible colored beads: Optional, to create the "star" decorations on the top tier.
- Piping bag with a #32 star tip or another large star tip: To create a pretty shell border on both tiers.
Step by step instructions


Day 1
- Bake three 8-inch cake rounds and three 10-inch cake rounds using your favorite cake recipe, such as My Favorite Chocolate Cake Recipe . You will need about 9 cups of batter for the 8-inch rounds and 15 cups for the 10-inch rounds. Cool completely and then wrap each round in plastic wrap.
- Wolf: Using a cutter like this one, cut out gray and white fondant shapes and stick them together as shown using either water or edible "food adhesive." The gray section should be between ¼ and ½ inch thick so that it is study enough to stand up, once dried.
- Moon: Roll out ivory tinted fondant to between ¼ and ½ inch thick. Cut a 4-inch circle from the fondant. Use a round fondant tool to create craters in the moon. Let pieces dry overnight or longer to firm up. Once the pieces are firm enough, stick toothpicks or skewers in the bottoms, which will be used to attach the pieces to the cake.


Day 2
4. Prepare a buttercream, such as a Swiss meringue buttercream or my easy White Chocolate Buttercream . You will need about 16 cups of buttercream for the two-tiered cake.
5. Place one of the 10-inch cake layers on a cake board or serving plate, securing it with a dab of buttercream. Pipe or spread about 1-½ cups buttercream evenly on top. Place a second layer on top of the first and spread it with 1-½ cups buttercream. Top it with the third cake layer and spread an even, thin coat of buttercream over the entire cake tier. Chill for at least 20 minutes to set the buttercream (this is your "crumb coat.")


6. Place one of the 8-inch cake layers on a cardboard cake round, securing it with a dab of buttercream. Pipe or spread about 1 cup buttercream evenly on top. Place a second layer on top of the first and spread it with 1 cup buttercream. Top it with the third cake layer and spread an even, thin coat of blue-colored buttercream over the entire cake tier to form a crumb coat. Chill for at least 20 minutes.
Would you like to save this?


7. Once the tiers are chilled, apply a second thicker coat of the buttercream to each (blue buttercream for the 8-inch tier.) Use an offset spatula or a cake scraper to smooth the tops and sides, then chill 20 minutes.


8. Measure the top of the bottom (10-inch) tier to find the center. Then cut two dowels to the height of the tier and insert them on either side of the center. These will be used to hold up the top tier. Cut a third dowel about 3 inches taller than the bottom tier and insert it directly in the center of the cake.
9. Carefully slide the top tier over the center dowel, fitting it into the hole in the center of the cake board that is underneath the top tier.


10. Roll out white fondant to about a ⅛ inch thickness. Use cloud shaped cutters to cut out clouds, or cut them out by hand using a paring knife. Place the clouds around the bottom of the top tier, adhering with water or food-safe adhesive.
11. Place edible pearls (blue, silver and white are all good colors) around the top tier to look like stars in the sky.


12. Roll out blue, aqua and gray fondants to about ⅛-inch thickness. Cut out mountain shapes of various heights using all three colors. Attach the mountain shapes to the bottom tier, overlapping and alternating colors.


13. Using white buttercream and a piping bag fitted with a large star tip (such as a #32 tip), pipe a shell border around the bottom tier. Then do the same around the top tier with blue buttercream.
14. Attach the dried fondant wolf and moon (and then the tree, if desired) to the top of the wolf cake.
Video: See my Wolf Cake come together from start to finish!
Frequently asked questions
You can freeze a frosted cake as long as it has been decorated with buttercream or cream cheese frosting. Meringue-type frostings do not freeze well. Freeze the decorated cake for 1 hour to set the frosting. Then, wrap the cake tightly in aluminum foil or plastic wrap and freeze for up to 3 months.
While most people tend to cut a cake in wedges out of habit, this method yields portions that are often too large and awkward to slice. A better method is to cut the cake in a grid. This will give you more servings per tier and neater slices. Cut straight across the cake in 1-½ inch increments, and then cut each long slice into 2-inch portions so that you are left with pieces that are 1-½ inches by 2 inches by the height of the cake.
There are a few different methods that you can use if you are short on time and need your fondant to dry quickly rather than over a day or two (depending on the thickness.) First, you can mix the fondant with Tylose Powder, a drying agent, before rolling it out or shaping it. You can also dry fondant pieces in the oven. Place the fondant pieces on a lined cookie sheet, then put the cookie sheet in the oven, and turn the oven light on. Pieces should dry within a few hours depending on their size.
Can't get enough cake? Check out some of my other recipes, perfect for special occasions:
Tried this recipe and loved it? Take a photo and tag me on Instagram or give it a review!
Wolf Cake
Ingredients
- 24 cups cake batter
- 16 cups buttercream (Swiss meringue or American buttercream)
- white fondant
- gel paste food coloring (blue, light blue, black, ivory, green)
- edible pearls or beads
Would you like to save this?
Instructions
Day 1
- Bake three 8-inch cake rounds and three 10-inch cake rounds using your favorite cake recipe (such as My Favorite Chocolate Cake Recipe .) You will need about 9 cups of batter for the 8-inch rounds and 15 cups for the 10-inch rounds. Cool completely and then wrap each round in plastic wrap.
- Wolf: Using a cutter like this one, cut out gray and white fondant shapes and stick them together as shown using either water or edible "food glue." The gray section should be between ¼ and ½ inch thick so that it is study enough to stand up, once dried. You can also form a wolf shape by hand (see Notes.)
- Moon: Roll out ivory tinted fondant to between ¼ and ½ inch thick. Cut a 4-inch circle from the fondant. Use a round fondant tool to create craters in the moon. Let pieces dry overnight or longer to firm up. Once the pieces are firm enough, stick toothpicks or skewers in the bottoms, which will be used to attach the pieces to the cake.
Day 2
- Prepare a buttercream, such as a Swiss meringue buttercream or my easy White Chocolate Buttercream . You will need about 16 cups of buttercream for the two-tiered cake.
- Place one of the 10-inch cake layers on a cake board or serving plate, securing it with a dab of buttercream. Pipe or spread about 1½ cups buttercream evenly on top. Place a second layer on top of the first and spread it with 1½ cups buttercream. Top it with the third cake layer and spread an even, thin coat of buttercream over the entire cake tier. Chill for at least 20 minutes to set the buttercream. This is your "crumb coat."
- Place one of the 8-inch cake layers on a cardboard cake round, securing it with a dab of buttercream. Pipe or spread about 1 cup buttercream evenly on top. Place a second layer on top of the first and spread it with 1 cup buttercream. Top it with the third cake layer and spread an even, thin coat of blue-colored buttercream over the entire cake tier to form a crumb coat. Chill for at least 20 minutes.
- Once the tiers are chilled, apply a second thicker coat of the buttercream to each (blue buttercream for the 8-inch tier.) Use an offset spatula or a cake scraper to smooth the tops and sides. Chill 20 minutes.
- Measure the top of the bottom (10-inch) tier to find the center. Cut two dowels to the height of the tier and insert them on either side of the center. These will be used to hold up the top tier. Cut a third dowel about 3 inches taller than the bottom tier and insert it directly in the center of the cake.
- Carefully slide the top tier over the center dowel, fitting it into the hole in the center of the cake board that is underneath the top tier.
- Roll out white fondant to about a ⅛ inch thickness. Use cloud shaped cutters to cut out clouds, or cut them out by hand using a paring knife. Place the clouds around the bottom of the top tier, adhering with water or food-safe adhesive.
- Place edible pearls (blue, silver and white are all good colors) around the top tier to look like stars in the sky.
- Roll out blue, aqua and gray fondants to about ⅛ inch thickness. Cut out mountain shapes of various heights using all three colors. Attach the mountain shapes to the bottom tier, overlapping and alternating colors.
- Using white buttercream and a piping bag fitted with a large star tip (such as a #32 tip), pipe a shell border around the bottom tier. Do the same around the top tier with blue buttercream.
- Attach the dried fondant wolf and moon (and tree if desired) to the top of the wolf cake.
Video
Notes
- Fondant cutters: If you don't want to make the investment in fondant cutters for this cake, you can form your shapes freehand! Use a food-safe marker to trace shapes on the fondant and cut them out. You can also print out the shape of a wolf, clouds, mountains, etc, and use those as guides for tracing. If you don't have a 4-inch cutter for the moon shape, find a small plate or a mug to trace.
- As noted in the instructions, it is easiest to take your time with cake projects such as this one and make it over a two (or even three) day period. Bake the cake layers and form the top fondant pieces on day one, so that they have time to rest and dry. Assemble and decorate on day two.
This Wolf Cake is absolutely stunning! The design is so intricate, and I love how you've captured the essence of the wolf. I can't wait to try making it myself—thanks for sharing such a detailed tutorial!
This wolf cake is absolutely stunning! The detail in the design is incredible, and I love how it captures the essence of the wolf. Can't wait to try making my own version. Thanks for sharing the inspiration!
Wow, I absolutely love the creativity behind the Wolf Cake! The design is so intricate and the flavors sound incredible. I can't wait to try making this myself for my next party. Thanks for sharing such a fun recipe!
I absolutely love the idea of a Wolf Cake! The decoration sounds so intricate and fun, and it must be a fantastic centerpiece for any gathering. Can't wait to try making it myself!
THank you so much! It was a lot of work, but the end result was worth it!
This Wolf Cake is absolutely stunning! The design is so creative and whimsical, and I can only imagine how delicious it must taste. I can't wait to try making one for my next gathering. Thank you for sharing the recipe and tips!
Thank you so much!! I hope that you enjoy making it -- it was a fun project for sure 🙂
Wow, this Wolf Cake recipe looks amazing! I love how creative the design is, and I can't wait to try making it for my next gathering. The tips you provided for decorating are super helpful too! Thank you for sharing!
Thank you so much for your kind comment! It was a fun cake to make....the kids loved it 🙂
My daughter is excited for a wolf cake this year! This is so beautiful! What size wolf cutter did you order? The 5.5?
Thanks
Hi there! Yes, I used the 5.5 inch cutter for the top. Let me know if you have any more questions 🙂
OMG YOU MADE THIS! That is incredible! You have some mad skill. You should be on one of those cake shows on the Food Network! 😉
Thank you, Gigi! How nice of you to say that. This wasn't my best, but at least I got it done in time!!