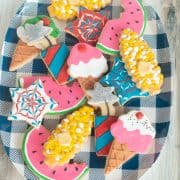
4th of July Cookies
Where I live, the 4th of July is a marathon. It's starts bright and early with a community pancake breakfast, followed by a parade, swimming, hopefully a nap, and then a seemingly endless line of parties and barbecues. Because the day is so busy, and I was taught to never show up empty-handed. My annual contribution to every event is a plate of my 4th of July Cookies....and maybe a blueberry galette.
These crisp, buttery, vanilla-orange cookies have become my calling card, so much so that if I turn up at a party without them, well, I might not be allowed to stay. People have been known to fight over the cute little corn cobs, so I always make extra.

Why these 4th of July Cookies go off with a bang!
- Tried and true sugar cookie recipe: I have made thousands of these vanilla-orange flavored sugar cookies (maybe tens of thousands...) You can see several of my designs on my Instagram account, and 100 of them in my cookbook, 100 Best Decorated Cookies. It was the cookie recipe that we used in my bakery, and it's the cookie recipe I use for every cookie order. The fact that it contains no baking powder or baking soda means that they don't rise much, giving you a flat surface on which to work. They are buttery, crisp, full of vanilla-orange flavor and a hint of salt.
- Lemon royal icing: I like to flavor my royal icing with lemon juice to cut through the sweetness of the confectioner's sugar and the sugar cookie itself. It creates a lovely, refreshing contrast that kids and adults love.
- Colorful (and doable!) designs: I've done my best to create fun, festive designs along with descriptive instructions, photos and videos so that you, too can create 4th of July cookie magic.
- They keep well.....and they ship well!: Depending on the humidity of your location, these cookies will keep for several weeks and remain perfectly crisp (although they rarely last more than a few days.) You can also freeze them, tightly sealed, for up to 3 months. Because they lie flat, they are also great candidates for shipping.


What is the 15 second royal icing rule?
The 15 second royal icing rule states that your icing, once piped onto a surface, will like completely flat and smooth within 15 seconds. In the mixing bowl this icing should have the consistency of hair gel or cool honey, slightly thicker than "flooding" icing, which smooths our almost immediately.
The beauty of icing that adheres to the 15 second rule is that you can use it for both outlining and filling a cookie without switching tools. It is thick enough to hold its shape when piped, but it is thin enough to create a smooth surface when used for piping. I used this icing for all of my 4th of July cookies.


To reach this icing consistency, add lemon juice to to stiff royal icing a tiny bit at a time (anywhere from 1 teaspoon (5 ml) to 1 tablespoon (15 ml), depending on how much icing you are thinning. Stir well after each addition and drizzle a ribbon across the top of your icing bowl. If it lies flat in 15 seconds, you have reached the correct consistency!
Video tutorial: See my 4th of July Cookies in action
Ingredients

- Flour: To make these cookies gluten-free, simply substitute your favorite, GF flour blend for the all-purpose flour.
- Kosher salt
- Unsalted butter: Softened to room temperature.
- Sugar
- Eggs
- Orange zest: Adding the zest of one large orange to my sugar cookie dough really sets the flavor apart, giving them the flavor reminiscent of a creamsicle.
- Pure vanilla extract: For recipes such as this one, where vanilla is a prominent flavor, try to avoid using imitation extracts.
- Confectioner's sugar
- Meringue powder: Meringue powder consists of powdered egg whites, cornstarch and stabilizers, and it is the key ingredient for getting your royal icing to set and dry. You can find it in the baking aisle of most craft stores or online via site like Amazon.
- Lemon juice: Since royal icing is so sweet, I like to thin mine out with lemon juice, which give it a nice, contrastingly tart flavor.
- Get paste food coloring: You have a choice when it comes to the type of food coloring that you use: liquid or gel paste. I almost alway use gel paste because the color is more concentrated and the paste's thicker texture does not affect the icing's consistency.
- White fondant and sanding sugar (optional): You will only need fondant to create the small "pats of butter" on the corn cob cookies. While these are certainly cute, they are also optional!
Special equipment

- Assorted cookie cutters: My favorite sites to source cookie cutters are JB Cookie Cutters, Ann Clark, and Amazon. Sadly, Copper Gifts, which is where I sourced all of my pretty copper cutters, is no longer in business.
- Squeeze bottles: Used for piping the thinned icing colors. You can either buy these with piping tips on top or with a built in tip. Both work well.
- Piping bags: Used for piping the stiffer icing colors.
- Piping tips: For these recipes, you can get by with just #2 tips, which are small circles. If you want to do a little bit finer detail on decorations like the watermelon seeds, use a smaller #1 tip.
- Skewers or toothpicks: For assisting with the star cookie design and removing air bubbles.
Step by step photos and tutorials


Sugar cookies and royal icing
- Mix sugar cookie dough according the directions on the recipe card, below.
- Chill the dough. Roll out and cut desired 4th of July cookie shapes, such as watermelon, corn on the cob, stars, fireworks and ice cream cones. Space them on baking sheets; bake at 350F 12-15 minutes, until set and golden brown.
- Cool cookies on baking sheets for 5 minutes, and then transfer to wire racks to cool completely.
- Prepare royal icing according to recipe card, below. Once mixed, the icing should be stiff in consistency and the paddle attachment should stand up in the icing without sinking.

Watermelon cookies
Note: if you don't have a watermelon cookie cutter, cut circles using a 4-inch (10 cm) round cutter, then cur a flat top using a ruler as a guide. Create a bite mark by cutting a section with a small fluted round cutter.
- For this cookie design, you will need white icing along with icing tinted green, hot pink, and black. Place the green, white and black icings in pastry bags fitted with #2 tips. Thin the pink icing to 15-second icing consistency (see above) and transfer it to a squeeze bottle.
- Using green icing, pipe a border along the lower edge of the watermelon. Using white icing, pie a second layer just inside the green layer.
- Use hot pink icing to outline and flood the remaining portion if the cookie.
- Use the black icing to pipe several "seeds" in the watermelon. Angle the pastry bag at about 45 degrees and place the tip on the piping surface. Apply light pressure as you pull the tip away, creating a narrow end and a wider end.


Corn on the cob cookies
- For this cookie design, you will need white icing along with icing tinted light yellow, dark yellow. Thin these icings slightly so that they still hold they shape but are easy to pipe, and then transfer them to piping bags fitted with #2 rips. Tint additional icing dark yellow, thin it to 15-second icing consistency (see above), then transfer it to a squeeze bottle.
- Using thinned dark yellow icing, outline and flood corn cobs. Let icing set for at least one hour.
- Using light yellow icing, pipe individual small oval kernels on each cob, leaving space around each kernel. Using thicker dark yellow icing, add more kernels, still leaving space around each. Using white icing, add a few white kernels, leaving space. Let icings set 15 minutes.
- Repeat piping various kernels until all spaces on the cob is filled. Let icing set for at least one hour.
- Make the "pat of butter' (optional): Mold about 2 teaspoon (10 ml) very light yellow-tinted fondant into a ¾ inch (2 cm) flat square. Dab the top very lightly with water and sprinkle lightly with sanding sugar to mimic salt. Dab the back on the butter with icing and affix it to the corn cob.


Star shaped 4th of July cookies
- For this cookie, you will need red, white and blue icings thinned to 15-second icing consistency (see above), transfer the icings to squeeze bottles fitted with #2 tips.
- Outline and flood a star in red royal icing. Use a cake tester, skewer or a toothpick, fill in the star and get rid of air bubbles.
- Immediately start the circles! Using white icing, pipe a small round circle in the center of your star. Using blue icing, pipe a larger blue circle outside of the white circle.
- Continue to alternate white and blue circles until you get to the edges of the star points. As you can see, you will need to skip from point to point as the circles grow larger. Try to place the lines at the same place on each point.
- Working quickly, use a skewer or toothpick to draw lines inward to the center of the circle from the five outermost tips of the star's points.
- Next, use the skewer or toothpick to draw lines outward from the center of the circle to the five innermost spots that fall between the star's points.
- Play around with color combinations, alternating the base color of each cookie, to make an array of be-yoo-tee-ful stars.
Video tutorial for star shaped 4th of July cookies


Ice cream cone cookies
- For this cookie, you will need light brown, white, pink and dark brown tinted icings thinned to 15-second icing consistency (see above.) Transfer these icings to squeeze bottles fitted with #2 tips. Tint a small amount of stiff icing red and transfer it to a piping bag fitted with a #2 tip.
- Outline and flood lower ice cream "scoop" with pink icing (or whichever flavor is your favorite.) Fill in the "scoop" using toothpick or skewer.
- Repeat Steps 2 using dark brown icing for the upper "chocolate" scoop (again, pick your favorite colors.)
- Outline and fill in the cone using tan or light brown icing.
- Outline and fill in the top section using white icing.
- Carefully sprinkle colored sprinkles (or jimmies, as I like to call them), onto the top section of the cone (optional.) Let icings set 15 minutes.
- Pipe a red dot for the cherry on top of the white section.
- Using the light brown icing, pipe and outline on both sides of the cone and a diagonal criss-cross waffle design on top.
- (Optional) Using pink icing, pipe decorative swirls onto the pink scoop. Use mine as a guide, but you can make any fun curly-cue shapes that you like! Repeat with the dark brown section of the cookie.
Video tutorial for ice cream cone shaped 4th of July cookies
Frequently asked questions
Yes. Sugar cookies that have been baked and decorated with royal icing can be frozen. Make sure that this icing decorations have completely dried. Next, place the cookies in an airtight container, such as a plastic freezer zip-top bag or a sealed freezer-safe bin. Separate the layers of cookies with either parchment paper or waxed paper and freeze them for up to 3 months.
Because they lie flat and are fairly sturdy, decorated sugar cookies are great candidates for shipping and sharing! The best way to prevent any breakage is to use a tin or an airtight Tupperware container. Line the bottom with a material such as bubble wrap or tissue paper and stack the cookies in layers, separating each with more cushioning. Place the container in a shipping box and surround it with more cushion to prevent movement during the traveling process. And be sure to write "FRAGILE" and/or "PERISHABLE" on the outside of the shipping box.
Sometimes the weather will affect how long it takes for your royal icing to dry. If it is especially humid where you live, give the cookies a few extra hours to dry, and make sure that they are uncovered and have a chance to breathe. If the cookies haven't completely dried within one day, chances are that the consistency of the icing was too thin to begin with.
Want to try you hand at more cookie decorating? Check out these posts!
Tried this recipe and loved it? Take a photo and tag me on Instagram or give it a review!
4th of July Cookies
Equipment
- Star, corn, firecracker, watermelon, and ice cream cone cookie cutters (see Notes)
- 1 Rolling Pin
- Squeeze bottles or piping bags
- Decorating tips (recommend #1, #2, and #3 round tips)
- Gel paste food colors (yellow, pink, red, black, green, blue, brown)
- White fondant (optional)
- Toothpicks or skewers
- Silver sprinkles (optional)
Ingredients
Lemon Royal Icing
- 2 lb confectioner's sugar
- ⅓ cup meringue powder
- 14 tablespoon warm water
- 1 tablespoon lemon juice (plus more for thinning)
- 1 Vanilla Orange Sugar Cookies Recipe
Instructions
Sugar Cookies
- In a medium bowl, whisk together flour and salt.
- In the bowl of a mixer, beat sugar and butter on medium speed until light and fluffy, about 3 minutes. Beat in eggs, zest and vanilla until combined.
- WIth the mixer on low speed, gradually add the flour mixture, mixing until combined.
- Turn dough out onto a work surface and divide into four equal pieces Shape each piece into a flat disk. Wrap each disk tightly in plastic wrap. Refrigerate for at least 1 hour, until cold, or for up to 3 days.
- Preheat oven to 350 °F (180℃.). Line baking sheets with parchment paper. On a lightly floured work surface, roll out one disk of dough to a thickness of ¼ inch. Using a cookie cutter of your choice, cut out shapes and carefully transfer them to the prepared sheets, spacing them about 1 inch apart. Reroll scraps as necessary. Repeat process with more dough until both cookie sheets are full.
- Bake 12 to 15 minutes, until cookies are set and lightly browned. Let cookies cool on cookie sheets for 10 minutes, then carefully transfer cookies to wire racks to cool completely before decorating. As shown in the tutorials in the blog post.
Royal Icing
- In the bowl of an electric mixer, beat sugar and meringue powder on low speed until well combined.
- In a measuring cup (preferably one with a spout), stir together water and lemon juice. With the mixer on low speed, gradually add water mixture, mixing until combined. At this point the icing will be fairly runny.
- Increase the mixer to medium and mix for 4 minutes, stopping to scrape down the sides of the bowl as necessary.
- Increase mixer speed to high and beat for 3 minutes or until the icing is stiff and glossy and the whisk attachment can stand up in the icing without sinking.
Video
Notes
- This sugar cookie dough will make anywhere from 36 to 60 cookies, depending on the size of the cutter.
- Unbaked dough can be tightly wrapped and frozen for up to one month.
- Baked and decorated or undecorated cookies will keep, tightly wrapped, for up to 3 months in the freezer.
- Use your own variety of cookie cutters if you don't want to make the investment in specific shapes. You can also draw shapes freehand on a circular cutter or trace a shape that you've printed from your computer.

LOVED the video. WELL DONE. Just so fun. Am going to show it to some of my grands!!
Thank you so much, Nancy!! Wishing you and your family a safe and happy 4th of July!!